Adding Search Metadata to Publishing Site Pages in SharePoint 2010

Scenario

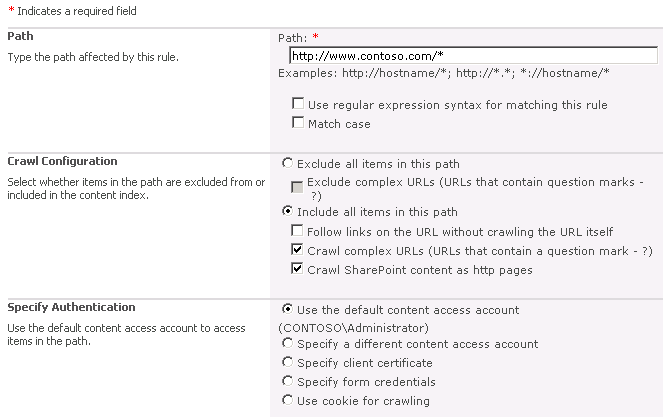
You have a SharePoint publishing site with a number of pages that display dynamic content based on a query string. You followed a process similar to Crawling Publishing Sites in SharePoint 2010 to configure SharePoint search to index the dynamic page content. Now you’d like to enrich the items in the search index with additional metadata that can be used for property restriction queries or for adding custom refiners.

Solution

Add dynamically generated META tag to the page. SharePoint will automatically create a crawled property of type Text under in the Web category using the name attribute of the META tag as the crawled property name. You can then map the crawled property to a new managed property that will get its value populated with the content attribute value of the META tag.

Example

I’ll use the web part and pages created in my previous blog post and will simply extend the web part to generate a META tag.

[ToolboxItemAttribute(false)]
public class ProductInformation : WebPart
{
    protected override void CreateChildControls()
    {
        // get the model number from query string
        string modelNumber = Page.Request.QueryString["ModelNumber"];
        if (!string.IsNullOrEmpty(modelNumber))
        {
            // assign a product category based on the model number
            string productCategory = string.Empty;
            switch (modelNumber)
            {
                case "M300":
                case "M400":
                case "M500":
                case "X200":
                case "X250":
                    productCategory = "Digital Camera";
                    break;
                case "X300":
                case "X358":
                case "X400":
                case "X458":
                case "X500":
                    productCategory = "Digital SLR";
                    break;
            }

            // set the page title
            ContentPlaceHolder contentPlaceHolder = (ContentPlaceHolder)Page.Master.FindControl("PlaceHolderPageTitle");
            contentPlaceHolder.Controls.Clear();
            contentPlaceHolder.Controls.Add(new LiteralControl() { Text = string.Format("{0} {1}", modelNumber, productCategory) });

            // add the model number and product category to the page as an H2 heading
            Controls.Add(new LiteralControl() { Text = string.Format("<h2>{0} {1}</h2>", modelNumber, productCategory) });

            // generate a META tag
            Page.Header.Controls.Add(new HtmlMeta() { Name = "modelnumber", Content = modelNumber });
        }
    }
}

If we refresh one of the product information pages after deploying the code change above, we should be able to see the META tag in the page source.

<meta name="modelnumber" content="M300" />

Now run a full crawl and then verify that the crawled property was created by going to Central Administration > Search Service Application > Metadata Properties > Crawled Properties (for SharePoint Search) or to Central Administration > Query SSA > FAST Search Administration > Crawled property categories > Web (for FAST Search).

Next, create a new managed property of type Text and add a mapping to the crawled property above. If using FAST Search, also check the Query property and Refiner property checkboxes.

Run another full crawl and the managed property is now ready to be used for property restriction queries or as a refiner.

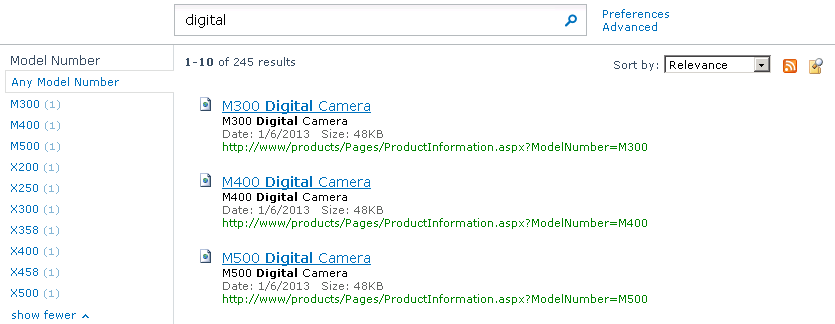
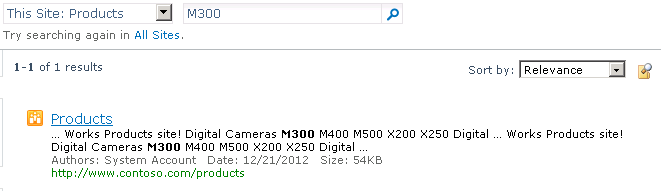
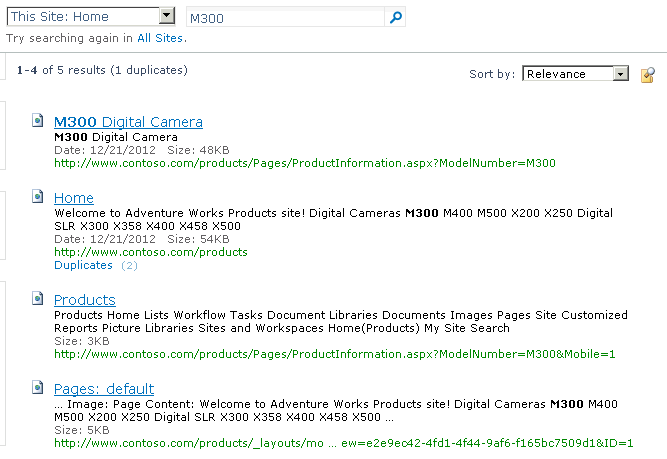
Let’s test it by running the following query first:
PropertyRestrictionQuery

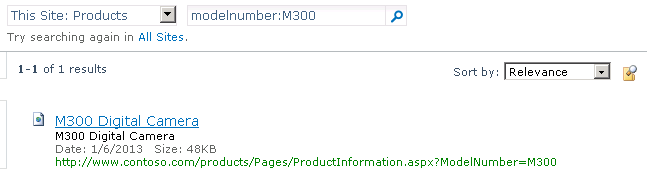
You can now also use the new managed property as a refiner.
CustomPropertyRefiner

Crawling Publishing Sites in SharePoint 2010

Scenario

You have a publishing site with a number of pages that use web parts to display dynamic content based on a query string parameter value. You crawl the site using the SharePoint connector but all you can find is the static page content – the dynamic content generated by the web parts is not searchable.

Solution

The SharePoint connector indexes the content of the Pages library but it ignores “complex URLs” meaning that it ignores URLs that contain query string parameters. The fix is simple – create a Crawl Rule in Central Administration and make sure that the fields are configured as follows:

  • Path: http://hostname/*
  • Crawl Configuration: Include all items in this path
    • Crawl comlex URLs
    • Crawl SharePoint content as http pages

Run a Full Crawl after adding the crawl rule and the dynamic page content should now be searchable.

Example

Let’s say we have a marketing site used to promote a number of different products. We created a single publishing page to show product information for all of the different product models and added the following web part to the page to dynamically set the page title and add product details to the page.

[ToolboxItemAttribute(false)]
public class ProductInformation : WebPart
{
    protected override void CreateChildControls()
    {
        // get the model number from query string
        string modelNumber = Page.Request.QueryString["ModelNumber"];
        if (!string.IsNullOrEmpty(modelNumber))
        {
            // assign a product category based on the model number
            string productCategory = string.Empty;
            switch (modelNumber)
            {
                case "M300":
                case "M400":
                case "M500":
                case "X200":
                case "X250":
                    productCategory = "Digital Camera";
                    break;
                case "X300":
                case "X358":
                case "X400":
                case "X458":
                case "X500":
                    productCategory = "Digital SLR";
                    break;
            }

            // set the page title
            ContentPlaceHolder contentPlaceHolder = (ContentPlaceHolder)Page.Master.FindControl("PlaceHolderPageTitle");
            contentPlaceHolder.Controls.Clear();
            contentPlaceHolder.Controls.Add(new LiteralControl() { Text = string.Format("{0} {1}", modelNumber, productCategory) });

            // add the model number and product category to the page as an H2 heading
            Controls.Add(new LiteralControl() { Text = string.Format("<h2>{0} {1}</h2>", modelNumber, productCategory) });
        }
    }
}

There’s also a static rollup page with a link to each product information page.
ProductRollupPage

We run a full crawl using a SharePoint connector and search the site for one of the product model numbers. All we get back is a single result to the rollup page.
ProductSearchBefore

Navigate to Central Administration > Search Service Application > Crawl Rules and create a new crawl rule using the settings below.
CrawlRuleComplexURLs

Run another full content crawl and then search the site for the same product model number used previously. This time the product information page is included in the search results.
ProductSearchAfter

Crawler Impact Rules in SharePoint 2010

In SharePoint 2010, you can control the content crawl rate at the search service application level by using Crawler Impact Rules. By default, the number of simultaneous requests changes dynamically based on the server hardware and utilization. Crawler impact rules are often used to throttle the request rate for external websites. You can manage crawler impact rules in Central Administration > Search Service Application > Crawler Impact Rules.

Let’s watch the Filtering Threads and Idle Threads from the OSS Search Gatherer category in Performance Monitor during a content crawl before any crawler impact rules are defined.

In my development VM, I see that the number of filtering threads stays at around 20 and the number of idle threads around 12 for the duration of the crawl which means that an average of 8 threads are being used by the gatherer process.

Next, let’s create a new crawler impact rule to limit the number of simultaneous requests to 2 using the * site name wildcard to apply the rule to all sites.

If we keep an eye on the performance counters this time, we can see that now the difference between the number of filtering and idle threads during a crawl equals to 2 (11 filtering threads and 9 idle threads in the example below).

The performance counters confirmed that our new crawler impact rule is working. Be careful when you delete a crawler impact rule though! I’ve seen it a number of times in different SharePoint farms that SharePoint remembers and keeps using the last deleted crawler impact rule. I verified it by monitoring the performance counters – the deleted crawler impact rule remains in effect until the the SharePoint Server Search 14 service is restarted (or a new rule is added that overrides the deleted rule settings). So remember – restart the SharePoint Server Search 14 windows service after deleting a crawler impact rule!

Export Search Service Application Crawler Settings to PowerShell in SharePoint 2010

If you ever wanted to take a snapshot of your search service application crawler settings in SharePoint 2010 then you already know that there’s no easy way of doing it without writing custom code. Even if you initially deployed crawler settings to your SharePoint farm using PowerShell scripts, chances are that some settings have been updated manually and the current configuration no longer matches the original deployment scripts. The following PowerShell script exports the main properties of Content Sources, Crawl Rules and Server Name Mappings that exist within a search service application. It’s not complete by any means but can serve as a starting point to be customized and extended to match your specific requirements. One thing to highlight is that the script doesn’t simply export the current search crawler settings to a data file but it actually translates your configuration into PowerShell commands that can later be executed to restore crawler settings to the current state.

$ssaName = "FASTContent"
$searchApp = Get-SPEnterpriseSearchServiceApplication $ssaName

$filePath = "ContentSourcesExport.ps1"
"`$searchApp = Get-SPEnterpriseSearchServiceApplication `"$ssaName`"" | Out-File $filePath
Get-SPEnterpriseSearchCrawlContentSource -SearchApplication $searchApp | Foreach-Object {"New-SPEnterpriseSearchCrawlContentSource -SearchApplication `$searchApp -Name `"" + $_.Name + "`" -Type " + $_.Type + " -StartAddresses `"" + [System.String]::Join(",",$_.StartAddresses) + "`""} | Out-File $filePath -Append

$filePath = "CrawlRulesExport.ps1"
"`$searchApp = Get-SPEnterpriseSearchServiceApplication `"$ssaName`"" | Out-File $filePath
Get-SPEnterpriseSearchCrawlRule -SearchApplication $searchApp | Foreach-Object {"New-SPEnterpriseSearchCrawlRule -SearchApplication `$searchApp –Path `"" + $_.Path + "`" –CrawlAsHttp `$" + $_.CrawlAsHttp + " -Type " + $_.Type + " -FollowComplexUrls `$" + $_.FollowComplexUrls} | Out-File $filePath -Append

$filePath = "ServerNameMappingsExport.ps1"
"`$searchApp = Get-SPEnterpriseSearchServiceApplication `"$ssaName`"" | Out-File $filePath
Get-SPEnterpriseSearchCrawlMapping -SearchApplication $searchApp | Foreach-Object {"New-SPEnterpriseSearchCrawlMapping -SearchApplication `$searchApp -Url `"" + $_.Source + "`" -Target `"" + $_.Target + "`""} | Out-File $filePath -Append

The script below can be used to easily delete all of Content Sources, Crawl Rules and Server Name Mappings that exist within a given search service application.

$ssaName = "FASTContent"
$searchApp = Get-SPEnterpriseSearchServiceApplication $ssaName

Get-SPEnterpriseSearchCrawlContentSource -SearchApplication $searchApp | Remove-SPEnterpriseSearchCrawlContentSource

Get-SPEnterpriseSearchCrawlRule -SearchApplication $searchApp | Remove-SPEnterpriseSearchCrawlRule

Get-SPEnterpriseSearchCrawlMapping -SearchApplication $searchApp | Remove-SPEnterpriseSearchCrawlMapping

LinkedIn People Search Web Parts for SharePoint 2010

Earlier this week I created my first public repository on GitHub: LinkedIn people search web parts for SharePoint 2010. The project consists of a number of web parts that can be used to perform people search using LinkedIn JavaScript API, display the results and even refine the returned profiles similar to the way SharePoint people search works. It is a sandboxed solution since all of the functionality is client-side and is implemented in JavaScript/jQuery and currently contains the following web parts:

  • LinkedIn People Search Box
  • LinkedIn People Search Refinement
  • LinkedIn People Search Results
  • LinkedIn People Search Statistics

Follow the usage instructions to build a LinkedIn people search page that looks and feels like SharePoint people search and feel free to send me your feedback.

Revert customized master pages back to ghosted state in SharePoint 2010

When you first deploy master pages and page templates as part of a SharePoint 2010 solution package and then provision the deployed files to the master page gallery using a feature, the provisioned files start in a ghosted state and get automatically updated on every package deployment. What happens if someone makes manual changes to the provisioned files in SharePoint Designer or by uploading an updated version of the file to the master page gallery is that the edited pages get disconnected from the page version that is deployed to the file system by the SharePoint solution package and become customized, or unghosted. Any page changes deployed as part of the SharePoint solution package after that aren’t going to be reflected on the site until the pages are uncustomized and return back to the ghosted state. The process of reverting the customized files back to the ghosted state using the SharePoint UI usually involves deleting the file from the master page gallery and then reactivating the feature to provision the deployed file. This solution is not always possible or easy to do as there may be many pages that depend on the customized page template or sites using the customized master page and SharePoint UI won’t allow you to delete the file from the gallery if that’s the case. Luckily, there’s a simple way to accomplish the desired effect in PowerShell!

First, get a reference to the root SPWeb object for the site collection and check the customization status of the page:

Add-PSSnapIn Microsoft.SharePoint.PowerShell -ErrorAction SilentlyContinue

$web = Get-SPWeb http://intranet.contoso.com
$file = $web.GetFile("/_catalogs/masterpage/MyCustomMasterPage.master")
$file.CustomizedPageStatus

The possible page customization options are:

  • Uncustomized – the page is not customized and is in the ghosted state. No action is necessary.
  • Customized – the page has been customized and is currently in the unghosted state. This page can be reverted back to the ghosted state using the script below.
  • None – the page was never ghosted. This is often the case if the master page was uploaded to the master page gallery first and only then added to the SharePoint deployment package. The only solution here is to delete the file and reactivate the feature to provision the deployed version of the page.

The following script will revert any customized page back to the ghosted state:

if($file.CustomizedPageStatus -eq "Customized") {
    $file.RevertContentStream()
    $file.CustomizedPageStatus
}

At this point the page customization status will change to Uncustomized, the page will return back to the ghosted state and will be in sync with the page version deployed as part of the SharePoint deployment package.

Enable Query Suggestions in SharePoint 2010

The concept of query suggestions is already well described in the Manage query suggestions TechNet article. One thing you might have noticed is that query suggestions are only enabled by default in the Search Center site templates (available for both SharePoint Search and FAST Search) but are not enabled for the search box located in the page header of other standard SharePoint site templates. In this blog post I’m going to show how to override the default behavior and enable search query suggestions for sites created using the Team Site template without modifying the out-of-the-box master page.

First, let’s go ahead and create some query suggestions using the following PowerShell command:

$searchapp = Get-SPEnterpriseSearchServiceApplication -Identity "FASTQuery"

New-SPEnterpriseSearchLanguageResourcePhrase -SearchApplication $searchapp -Language En-Us -Type QuerySuggestionAlwaysSuggest -Name "M300 Digital Camera"
New-SPEnterpriseSearchLanguageResourcePhrase -SearchApplication $searchapp -Language En-Us -Type QuerySuggestionAlwaysSuggest -Name "M400 Digital Camera"
New-SPEnterpriseSearchLanguageResourcePhrase -SearchApplication $searchapp -Language En-Us -Type QuerySuggestionAlwaysSuggest -Name "M500 Digital Camera"
New-SPEnterpriseSearchLanguageResourcePhrase -SearchApplication $searchapp -Language En-Us -Type QuerySuggestionAlwaysSuggest -Name "X200 Digital Camera"
New-SPEnterpriseSearchLanguageResourcePhrase -SearchApplication $searchapp -Language En-Us -Type QuerySuggestionAlwaysSuggest -Name "X250 Digital Camera"
New-SPEnterpriseSearchLanguageResourcePhrase -SearchApplication $searchapp -Language En-Us -Type QuerySuggestionAlwaysSuggest -Name "Z500 Digital Camera"

Start-SPTimerJob -Identity "Prepare query suggestions"

Once the timer jobs completes, we should see query suggestions in the search center:

But what about the standard site pages? Well, the query suggestions are disabled there by default. Next, we are going to build a new site collection feature that turns the query suggestions on for the entire site collection.

Let’s go ahead and create a new empty SharePoint 2010 project in Visual Studio 2010 and add a new site collection feature.

Now we need to add a new Empty Element item to the project and populate the Elements.xml file with the following content:

<?xml version="1.0" encoding="utf-8"?>
<Elements xmlns="http://schemas.microsoft.com/sharepoint/">
	<Control
		Id="SmallSearchInputBox"
		Sequence="24"
		ControlClass="Microsoft.SharePoint.Portal.WebControls.SearchBoxEx"
		ControlAssembly="Microsoft.Office.Server.Search, Version=14.0.0.0, Culture=neutral, PublicKeyToken=71e9bce111e9429c">
		<Property Name="GoImageUrl">/_layouts/images/gosearch15.png</Property>
		<Property Name="GoImageUrlRTL">/_layouts/images/gosearchrtl15.png</Property>
		<Property Name="GoImageActiveUrl">/_layouts/images/gosearchhover15.png</Property>
		<Property Name="GoImageActiveUrlRTL">/_layouts/images/gosearchrtlhover15.png</Property>
		<Property Name="UseSiteDefaults">true</Property>
		<Property Name="FrameType">None</Property>
		<Property Name="ShowAdvancedSearch">false</Property>
		<Property Name="DropDownModeEx">HideScopeDD_DefaultContextual</Property>
		<Property Name="UseSiteDropDownMode">true</Property>
		<Property Name="ShowQuerySuggestions">True</Property>
	</Control>
</Elements>

Your project structure at this point should be similar to the screenshot below:

Build and deploy the solution package and activate the site collection feature. Start typing the search query and you should see the query suggestions now but it’s obvious that the out-of-the-box SharePoint styles don’t work properly in this case:

In order to resolve this style issue we have to override a couple of the SharePoint styles. Start by right-clicking the project in Solution Explorer, then going to Add -> SharePoint “Layouts” Mapped Folder. Then add a new css file with the following content:

.s4-search INPUT {
	FLOAT: none !important
}
.s4-rp DIV {
	DISPLAY: block !important
}

The last step is to add the new css file reference to the SharePoint master page. We’ll do it by updating the existing Elements.xml to add a custom CssRegistration to AdditionalPageHead. Here’s the final Elements.xml file content and project structure:

Deploy the solution package once again and check out the query suggestions styling now – everything should look and work as expected now:

References:

  1. Manage query suggestions (SharePoint Server 2010)

Show Search Results on Any Page in SharePoint 2010

SharePoint users and site owners often think of search results as a stand-alone page but it’s also a great way to aggregate content across different sites, site collections and even web applications that share the same search index without the limitations and performance issues associated with querying SharePoint lists and document libraries directly. In this blog post I’ll explain how to use the out-of-the-box Search Core Results web part to show search results on virtually any SharePoint 2010 page. We’ll use the Fixed Keyword Query property of the web part to define the search query to be executed automatically whenever a user visits the page.

First of all, we need to edit a page and add a Search Core Results web part to it:

Next, let’s edit the web part and set the Fixed Keyword Query property to the desired search query:

Then, set the Location web part property to the configure where the search results will be coming from. In this case I use FAST Search:

And that’s it, just save your changes, refresh the page and you’ll see the expected search results right on the page:

The Search Core Results web part is very flexible and exposes many different properties that allow you to customize what information is displayed and how the search results will appear on the page so I highly recommend spending some time to familiarize yourself with the customization options available out-of-the-box and require no custom web part development efforts.

Adding a Custom Property Search Refiner in SharePoint 2010

In the previous blog post Extending FAST Search Processing Pipeline we created a new custom managed property called Project and extended the FAST Search processing pipeline to populate the property with values. In this article we’ll give users the ability to refine results based on the new property values by adding a new refiner to the search results page in the search center.

First we’ll navigate to the results.aspx page by submitting a search query.

Next we need to Edit the page and bring up the Refinement Panel properties.

The properties we are interested in are the Filter Category Definition and Use Default Configuration. Go ahead and copy the Filter Category Definition property content into your favorite text editor. Insert the following element into the original xml content. Note that the managed property name set in the MappedProperty attribute must be in all lower case letters.

<Category Title="Project" Description="Project number" Type="Microsoft.Office.Server.Search.WebControls.ManagedPropertyFilterGenerator" MetadataThreshold="1" NumberOfFiltersToDisplay="4" MaxNumberOfFilters="20" ShowMoreLink="True" MappedProperty="project" MoreLinkText="show more" LessLinkText="show fewer" ShowCounts="Count" />

Then make sure to uncheck the Use Default Configuration checkbox, hit Apply to submit the web part changes and Save the page. You should see similar results as in the screenshot below:

Now the users have the ability to easily refine search results by Project without having to go back and add any additional metadata to existing SharePoint content – the Project property values are generated dynamically based on the location of the document within SharePoint site hierarchy by the custom processing pipeline module implemented in the earlier blog post.

Extending FAST Search Processing Pipeline

One of the major benefits of using FAST Search for SharePoint Server 2010 (FS4SP) is the ability to extend the item processing pipeline and modify existing or populate new crawled properties of each document programmatically. This concept may sound complicated at first but in reality it’s not that hard at all. In this blog post I’m going to show how to integrate a C# console application into the processing pipeline and use custom logic to populate an additional crawled property for each item in the search index.

Let’s say we have a number of SharePoint project sites where each site contains information about a different digital camera model and we’d like to tag each document located within any of the project sites with the project name (camera model) in the search index without adding any extra metadata to SharePoint items.

To accomplish that we are going to populate a custom crawled property called Project by extracting the project name from site urls that match a specific pattern:

  • http://intranet/sites/sp2010pillars/Projects/M300/
  • http://intranet/sites/sp2010pillars/Projects/M400/
  • http://intranet/sites/sp2010pillars/Projects/M500/
  • http://intranet/sites/sp2010pillars/Projects/X200/
  • http://intranet/sites/sp2010pillars/Projects/X250/

First of all we need to create a new crawled property to be populated. It is a good practice to create a new crawled property category so that the custom crawled properties don’t get mixed up with SharePoint or any other properties in the search index schema. Since crawled property categories are uniquely identified with a GUID, we need to generate a new GUID. One option is to use Visual Studio 2010 for that – Tools -> Create GUID:

Next we’ll use PowerShell to create the new category called Custom and add the new Project crawled property to it. In the next blog post I’m planning to show how to add a new refiner to the FAST Search Center based on the values we populate the Project crawled property with so let’s go ahead and create and map it to a new managed property.

Add-PSSnapin Microsoft.FASTSearch.Powershell -ErrorAction SilentlyContinue

$guid = "{21FDF551-3231-49C3-A04C-A258052C4B68}"
New-FASTSearchMetadataCategory -Name Custom -Propset $guid

$crawledproperty = New-FASTSearchMetadataCrawledProperty -Name Project -Propset $guid -Varianttype 31
$managedproperty = New-FASTSearchMetadataManagedProperty -Name Project -type 1 -description "Project name extracted from the SharePoint site url"

Set-FASTSearchMetadataManagedProperty -ManagedProperty $managedproperty -Refinement 1
New-FASTSearchMetadataCrawledPropertyMapping -ManagedProperty $managedproperty -CrawledProperty $crawledproperty

Now we are ready to create the console application that contains our custom logic.

The following code is going to be used to read the url input crawled property value, check if it matches our project site url pattern and extract the project name from the url if it’s a match.

using System;
using System.Linq;
using System.Xml.Linq;
using System.Text.RegularExpressions;

namespace Contoso.ProjectNameExtractor
{
    class Program
    {
        // special property set GUID that contains the url crawled property
        public static readonly Guid PROPERTYSET_SPECIAL = new Guid("11280615-f653-448f-8ed8-2915008789f2");

        // Custom crawled property category GUID that contains the Region crawled property
        public static readonly Guid PROPERTYSET_CUSTOM = new Guid("21FDF551-3231-49C3-A04C-A258052C4B68");

        // crawled property name to be populated
        public const string PROPERTYNAME_REGION = "Project";

        static void Main(string[] args)
        {
            XDocument inputDoc = XDocument.Load(args[0]);

            // retrieve the url input property value
            string url = (from cp in inputDoc.Descendants("CrawledProperty")
                          where new Guid(cp.Attribute("propertySet").Value).Equals(PROPERTYSET_SPECIAL) &&
                          cp.Attribute("propertyName").Value == "url" &&
                          cp.Attribute("varType").Value == "31"
                          select cp.Value).First();

            XElement outputElement = new XElement("Document");

            // project site url regex
            Match urlMatch = Regex.Match(url, "(?<=http://intranet.contoso.com/sites/sp2010pillars/Projects/).*?[^/]+", RegexOptions.IgnoreCase);
            if (urlMatch.Success)
            {
                // populate the custom Region crawled property
                outputElement.Add(
                    new XElement("CrawledProperty",
                        new XAttribute("propertySet", PROPERTYSET_CUSTOM),
                        new XAttribute("propertyName", PROPERTYNAME_REGION),
                        new XAttribute("varType", 31),
                        urlMatch.Value)
                        );
            }

            outputElement.Save(args[1]);
        }
    }
}

At this point we are ready to deploy the application to the FAST Search servers. In order to do that we need to copy the executable to each FAST server running document processors and modify the pipelineextensibility.xml file located in the FASTSearch\etc folder on each of those servers. Keep in mind that the pipelineextensibility.xml file can get overwritten if you install a FAST Search Server 2010 for SharePoint update or service pack. Below is the file content assuming that the executable is located in the FASTSearch\bin folder:

<PipelineExtensibility>
	<Run command="Contoso.ProjectNameExtractor.exe %(input)s %(output)s">
		<Input>
			<CrawledProperty propertySet="11280615-f653-448f-8ed8-2915008789f2" varType="31" propertyName="url"/>
		</Input>
		<Output>
			<CrawledProperty propertySet="21FDF551-3231-49C3-A04C-A258052C4B68" varType="31" propertyName="Project"/>
		</Output>
	</Run>
</PipelineExtensibility>

Once all of the above is in place, simply execute psctrl reset command in Microsoft FAST Search Server 2010 for SharePoint shell and submit a full crawl for the SharePoint content source. When the full crawl is complete let’s run a search query for “digital camera” and take a look at the Project property value in the results:

As you can see, the managed property is populated with the expected values. In the next post I’ll show how to use this new property as a custom refiner in the FAST Search Center.

References:

  1. Integrating an External Item Processing Component
  2. CrawledProperty Element [Pipeline Extensibility Configuration Schema]