Crawling Publishing Sites in SharePoint 2010

Scenario

You have a publishing site with a number of pages that use web parts to display dynamic content based on a query string parameter value. You crawl the site using the SharePoint connector but all you can find is the static page content – the dynamic content generated by the web parts is not searchable.

Solution

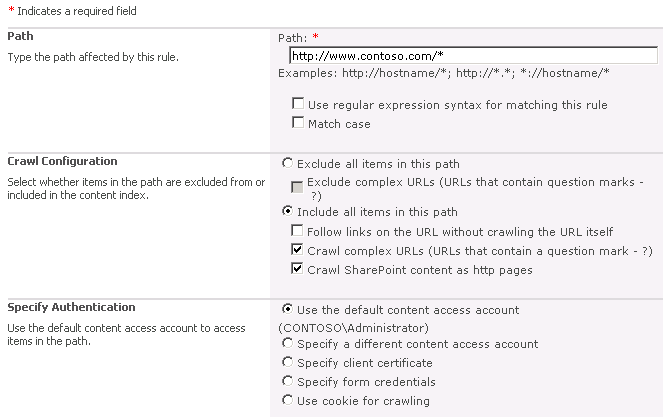
The SharePoint connector indexes the content of the Pages library but it ignores “complex URLs” meaning that it ignores URLs that contain query string parameters. The fix is simple – create a Crawl Rule in Central Administration and make sure that the fields are configured as follows:

  • Path: http://hostname/*
  • Crawl Configuration: Include all items in this path
    • Crawl comlex URLs
    • Crawl SharePoint content as http pages

Run a Full Crawl after adding the crawl rule and the dynamic page content should now be searchable.

Example

Let’s say we have a marketing site used to promote a number of different products. We created a single publishing page to show product information for all of the different product models and added the following web part to the page to dynamically set the page title and add product details to the page.

[ToolboxItemAttribute(false)]
public class ProductInformation : WebPart
{
    protected override void CreateChildControls()
    {
        // get the model number from query string
        string modelNumber = Page.Request.QueryString["ModelNumber"];
        if (!string.IsNullOrEmpty(modelNumber))
        {
            // assign a product category based on the model number
            string productCategory = string.Empty;
            switch (modelNumber)
            {
                case "M300":
                case "M400":
                case "M500":
                case "X200":
                case "X250":
                    productCategory = "Digital Camera";
                    break;
                case "X300":
                case "X358":
                case "X400":
                case "X458":
                case "X500":
                    productCategory = "Digital SLR";
                    break;
            }

            // set the page title
            ContentPlaceHolder contentPlaceHolder = (ContentPlaceHolder)Page.Master.FindControl("PlaceHolderPageTitle");
            contentPlaceHolder.Controls.Clear();
            contentPlaceHolder.Controls.Add(new LiteralControl() { Text = string.Format("{0} {1}", modelNumber, productCategory) });

            // add the model number and product category to the page as an H2 heading
            Controls.Add(new LiteralControl() { Text = string.Format("<h2>{0} {1}</h2>", modelNumber, productCategory) });
        }
    }
}

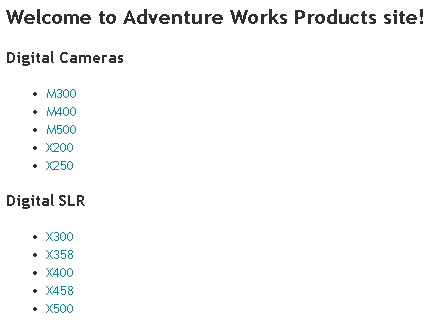
There’s also a static rollup page with a link to each product information page.
ProductRollupPage

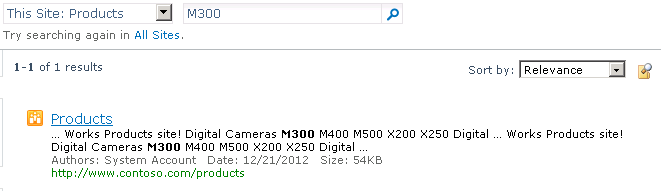
We run a full crawl using a SharePoint connector and search the site for one of the product model numbers. All we get back is a single result to the rollup page.
ProductSearchBefore

Navigate to Central Administration > Search Service Application > Crawl Rules and create a new crawl rule using the settings below.
CrawlRuleComplexURLs

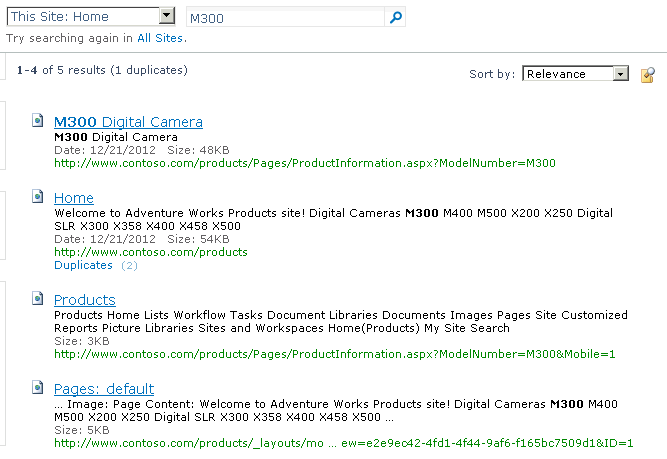
Run another full content crawl and then search the site for the same product model number used previously. This time the product information page is included in the search results.
ProductSearchAfter

Search-Driven Twitter Bootstrap Carousel in SharePoint 2013

Content Search web part introduced in SharePoint 2013 is a powerful tool that lets you easily retrieve and customize the appearance of search results without ever writing a single line of server-side code. In this post I’ll show how to display items from a SharePoint list in a Twitter Bootstrap Carousel on any page of your site using a Content Search web part and a custom control and item display templates.

  1. First thing we need to do is to create a SharePoint list that will contain the items to be displayed in the carousel. Let’s start by creating the site columns below.
    1. Navigate to Site Settings > Site columns > Create
    2. CarouselBody site column is going to hold the text to be displayed within each carousel slide.
      1. Name: CarouselBody
      2. Type: Full HTML content with formatting and constraints for publishing
      3. Group: Contoso
      4. Require that this column contains information: Yes
    3. CarouselImage site column will contain the image to be displayed as the slide background.
      1. Name: CarouselImage
      2. Type: Image with formatting and constraints for publishing
      3. Group: Contoso
      4. Require that this column contains information: Yes
    4. At this point the site columns should look something like this:
  2. Next, we need to create a content type
    1. Navigate to Site Settings > Site content types > Create
    2. The Carousel content type will group the site columns together
      1. Name: Carousel
      2. Parent Content Type: Item
      3. Group: Contoso
    3. Add the site columns
      1. Add from existing site columns
      2. Select columns from: Contoso
      3. Columns to add: CarouselBody, CarouselImage
    4. The content type now should look similar to this:
  3. Now it’s time to create the SharePoint list.
    1. Site Contents > add an app > Custom List
      1. Name: Carousel
    2. Enable content type management for the list.
      1. List Settings > Advanced settings
      2. Allow management of content types?: Yes
    3. Add the Carousel content type to the list content types
      1. List Settings > Content Types > Add from existing site content types
      2. Group: Contoso
      3. Content types to add: Carousel
    4. Remove the default Item content type from the list
      1. List Settings > Content Types > Item > Delete this content type
    5. The list settings should now be as below:
  4. Finally, we are ready to add some carousel items to the list.
  5.  Once the items are added, let’s go ahead and run a full crawl. The managed properties for each column in the list will be created automatically.
    1. Central Administration > Application Management > Manage service applications
    2. Search Service Application > Content Sources > Local SharePoint Sites > Start Full Crawl
  6. When the crawl is complete we can verify that all of the information we need is in the search index by running a REST API search query.
    1. http://intranet.contoso.com/_api/search/query?querytext=’contenttype:carousel’&selectproperties=’Title,CarouselBodyOWSHTML,CarouselImageOWSIMGE’
    2. The results should match the screenshot below:
  7. Before we move on to the next step, we need to download the jQuery library and Twitter Bootstrap Carousel package and upload those to the Site Assets document library.
    1. Download jQuery: http://code.jquery.com/jquery-1.8.2.min.js
    2. Download Bootstrap: http://twitter.github.com/bootstrap/customize.html
      1. Choose components: Carousel
      2. Select jQuery plugins: Carousel
    3. Site Contents > Site Assets
    4. Upload Document: jquery-1.8.2.min.js
    5. Upload Document: bootstrap.min.css
    6. Upload Document: bootstrap.min.js
    7. The contents of the Site Assets document gallery should look something like this:
  8. At this point we have the content we need available and can now start developing the custom display templates. We’ll do that by copying and editing some of the standard display templates that come with SharePoint 2013 and located in the master pages gallery.
    1. Site Settings > Master pages > Display Templates > Content Web Parts
    2. Control_List.html > Download a Copy
    3. Save As: Control_CarouselList.html
    4. Replace the content of the file with the following:
      <html xmlns:mso="urn:schemas-microsoft-com:office:office" xmlns:msdt="uuid:C2F41010-65B3-11d1-A29F-00AA00C14882">
      
      <head>
      
      <title>Carousel List</title>
      
      <!--[if gte mso 9]><xml>
      
      <mso:CustomDocumentProperties>
      
      <mso:TemplateHidden msdt:dt="string">0</mso:TemplateHidden>
      
      <mso:MasterPageDescription msdt:dt="string">This is a Carousel Control Display Template that will list the items.</mso:MasterPageDescription>
      
      <mso:ContentTypeId msdt:dt="string">0x0101002039C03B61C64EC4A04F5361F385106601</mso:ContentTypeId>
      
      <mso:TargetControlType msdt:dt="string">;#Content Web Parts;#</mso:TargetControlType>
      
      <mso:HtmlDesignAssociated msdt:dt="string">1</mso:HtmlDesignAssociated>
      
      </mso:CustomDocumentProperties>
      
      </xml><![endif]-->
      
      </head>
      
      <body>
      
          <!--
      
                  Warning: Do not try to add HTML to this section. Only the contents of the first <div>
      
                  inside the <body> tag will be used while executing Display Template code. Any HTML that
      
                  you add to this section will NOT become part of your Display Template.
      
          -->
      
          <script>
      
              $includeLanguageScript(this.url, "~sitecollection/_catalogs/masterpage/Display Templates/Language Files/{Locale}/CustomStrings.js");
      
      		$includeCSS(this.url, "~sitecollection/SiteAssets/bootstrap.min.css");
      
      		$includeScript(this.url, "~sitecollection/SiteAssets/jquery-1.8.2.min.js");
      
          </script>
      
          <!--
      
              Use the div below to author your Display Template. Here are some things to keep in mind:
      
              * Surround any JavaScript logic as shown below using a "pound underscore" (#_ ... _#) token
      
              inside a comment.
      
              * Use the values assigned to your variables using an "underscore pound equals"
      
              (_#= ... =#_) token.
      
          -->
      
          <div id="Control_CarouselList">
      
      <!--#_
      
      if (!$isNull(ctx.ClientControl) &&
      
          !$isNull(ctx.ClientControl.shouldRenderControl) &&
      
          !ctx.ClientControl.shouldRenderControl())
      
      {
      
          return "";
      
      }
      
      ctx.ListDataJSONGroupsKey = "ResultTables";
      
      var $noResults = Srch.ContentBySearch.getControlTemplateEncodedNoResultsMessage(ctx.ClientControl);
      
      var noResultsClassName = "ms-srch-result-noResults";
      
      var ListRenderRenderWrapper = function(itemRenderResult, inCtx, tpl)
      
      {
      
          var iStr = [];
      
          iStr.push(itemRenderResult);
      
          return iStr.join('');
      
      }
      
      ctx['ItemRenderWrapper'] = ListRenderRenderWrapper;
      
      ctx.OnPostRender = function() {
      
      	$("div.item").first().addClass("active");
      
      	$.getScript(SP.PageContextInfo.get_siteServerRelativeUrl() + "SiteAssets/bootstrap.min.js", function() {
      
      		$(".carousel").carousel();
      
      	});
      
      };
      
      _#-->
      
        <div id="myCarousel" class="carousel slide">
      
      	<div class="carousel-inner">
      
                  _#= ctx.RenderGroups(ctx) =#_
      
      	</div>
      
      	<a class="left carousel-control" href="#myCarousel" data-slide="prev">&lsaquo;</a>
      
      	<a class="right carousel-control" href="#myCarousel" data-slide="next">&rsaquo;</a>
      
        </div>
      
      <!--#_
      
      if (ctx.ClientControl.get_shouldShowNoResultMessage())
      
      {
      
      _#-->
      
              <div class="_#= noResultsClassName =#_">_#= $noResults =#_</div>
      
      <!--#_
      
      }
      
      _#-->
      
          </div>
      
      </body>
      
      </html>
      
      
    5. The carousel control display template is ready so we can upload it to the same location in the master pages gallery.
      1. Site Settings > Master pages > Display Templates > Content Web Parts
      2. Upload Document: Control_CarouselList.html
    6. You should see the Control_CarouselList.js file automatically generated by SharePoint 2013:
  9. The next step is to create an item display template for the carousel slides.
    1. Similar to the control display template created earlier, we are going to copy and edit a standard item display template.
      1. Site Settings > Master pages > Display Templates > Content Web Parts
      2. Item_PictureOnTop.html > Download a Copy
      3. Save As: Item_Carousel.html
    2. Replace the file content with the following:
      <html xmlns:mso="urn:schemas-microsoft-com:office:office" xmlns:msdt="uuid:C2F41010-65B3-11d1-A29F-00AA00C14882">
      <head>
      
      <title>Carousel item</title>
      
      <!--[if gte mso 9]><xml>
      
      <mso:CustomDocumentProperties>
      
      <mso:TemplateHidden msdt:dt="string">0</mso:TemplateHidden>
      
      <mso:ManagedPropertyMapping msdt:dt="string">'Image'{Image}:'CarouselImageOWSIMGE','Heading'{Heading}:'Title','Body'{Body}:'CarouselBodyOWSHTML'</mso:ManagedPropertyMapping>
      
      <mso:MasterPageDescription msdt:dt="string">This Item Display Template will show a carousel item.</mso:MasterPageDescription>
      
      <mso:ContentTypeId msdt:dt="string">0x0101002039C03B61C64EC4A04F5361F385106603</mso:ContentTypeId>
      
      <mso:TargetControlType msdt:dt="string">;#Content Web Parts;#</mso:TargetControlType>
      
      <mso:HtmlDesignAssociated msdt:dt="string">1</mso:HtmlDesignAssociated>
      
      </mso:CustomDocumentProperties>
      
      </xml><![endif]-->
      
      </head>
      
      <body>
      
          <!--
      
                  Warning: Do not try to add HTML to this section. Only the contents of the first <div>
      
                  inside the <body> tag will be used while executing Display Template code. Any HTML that
      
                  you add to this section will NOT become part of your Display Template.
      
          -->
      
          <script>
      
              $includeLanguageScript(this.url, "~sitecollection/_catalogs/masterpage/Display Templates/Language Files/{Locale}/CustomStrings.js");
      
          </script>
      
          <!--
      
              Use the div below to author your Display Template. Here are some things to keep in mind:
      
              * Surround any JavaScript logic as shown below using a "pound underscore" (#_ ... _#) token
      
              inside a comment.
      
              * Use the values assigned to your variables using an "underscore pound equals"
      
              (_#= ... =#_) token.
      
          -->
      
          <div id="Item_Carousel">
      
      <!--#_
      
      var carouselImage = $getItemValue(ctx, "Image");
      
      var carouselHeading = $getItemValue(ctx, "Heading");
      
      var carouselBody = $getItemValue(ctx, "Body");
      
      _#-->
      
      	  <div class="item">
      
      		_#= carouselImage.value =#_
      
      		<div class="carousel-caption">
      
      		  <h4>_#= carouselHeading =#_</h4>
      
      		  <p>_#= carouselBody =#_</p>
      
      		</div>
      
      	  </div>
      
          </div>
      
      </body>
      
      </html>
      
      
    3. Upload the custom item display template to the master pages gallery.
      1. Site Settings > Master pages > Display Templates > Content Web Parts
      2. Upload Document: Item_Carousel.html
    4. Verify that the associated Item_Carousel.js was successfully generated:
  10. At last, everything is in place and we can now add a Content Search web part to the page.
    1. Page > Edit
    2. Insert > Web Part > Content Rollup > Content Search
    3. Configure the web part to fetch carousel items from the search index and use the custom display templates created earlier.
      1. Edit Web Part
      2. Change Query
        1. Select a query: Items matching a content type
        2. Restrict by content type: Carousel
      3. Display Templates
        1. Control: Carousel List
        2. Item: Carousel Item
      4. Appearance
        1. Width: 830px (set to the width of your carousel images)
    4. Page > Save

At this point you should see the Twitter Bootstrap Carousel on the page displaying items from the Carousel SharePoint list.

Migrating a Virtual Machine from VMWare Workstation to Hyper-V

I recently started using Windows 8 as the primary OS on my Lenovo ThinkPad W530 mobile workstation. For the last couple of years I used virtual machines hosted by VMWare Workstation to do all of the development work since Hyper-V wasn’t supported on Windows 7 and have been waiting for Windows 8 to come out to play around with Hyper-V. I didn’t want to re-build all of my VMs from scratch in Hyper-V and decided to convert them from the VMWare format to Hyper-V. In this blog post I documented every step of the conversion process.

Step 0: Fully shut down the VM in VMWare Workstation

This is important – most developers that I know simply Suspend their VMs when they shut down or reboot the host machine. You need to Shut down the virtual machine in VMWare Workstation before you begin the conversion.

Step 1: Convert virtual hard disk from VMDK to VHD

The main part of the process is to convert the virtual hard disk format from VMDK to VHD. There’s a variety of conversion tools available for this task – I picked the WinImage utility since, ironically, I’ve used it in the past to convert VHD images to VMDK and found it to be very reliable.

If your VMDK virtual hard disk consists of multiple files, I recommend that you execute the following command to generate a single VMDK image:

vmware-vdiskmanager -r sourceDisk.vmdk -t 0 targetDisk.vmdk
  1. Download, install and start WinImage
  2. In the Disk menu, select Convert Virtual Hard Disk Image…
  3. In the Open file dialog, select VMWare VMDK (*.vmdk) as the file type and browse to your current VM location, select the file and press Open
  4. In the Convert Virtual Hard Disk Image dialog, pick Create Fixed Size Virtual Hard Disk Size to make your new VHD fixed-size or pick Create Dynamically Expanding Virtual Hard Disk to make it dynamic. I prefer the dynamically expanding option.
  5. In the Save As file dialog, browse to the location you’d like to save the VHD image and type in the File name and make sure the Save as type is set to Virtual Hard Disks (*.vhd), then press Save.

Step 2: Enable Hyper-V on your Windows 8 workstation

Obviously, the Hyper-V feature needs to be enabled on your workstation. It’s not enabled by default in Windows 8 so you’ll need to follow the steps below to enable it.

  1. Open Windows Control Panel
  2. Navigate to Programs > Programs and Features > Turn Windows features on or off
  3. Check the Hyper-V checkbox and press OK
  4. Follow the prompts to complete the installation

Step 3: Configure Hyper-V networking

If this is the first virtual machine on this Hyper-V host and you haven’t configured networking yet, follow the steps below to create a new virtual network:

  1. Start the Hyper-V Manager
  2. In the Action menu, select Virtual Switch Manager…
  3. Select External and press Create Virtual Switch
  4. Type in the Name, make sure that External network option is selected and pick the network card that provides Internet access in the dropdown, then press OK
  5. Press Yes on the Apply Networking Changes dialog

Step 4: Create a new virtual machine in the Hyper-V Manager

You are now ready to create a new Hyper-V virtual machine using the VHD image created earlier in Step 1.

  1. Open the Hyper-V Manager
  2. In the Action menu, select New > Virtual Machine… to launch the New Virtual Machine Wizard
  3. On the Before You Begin screen press Next
  4. On the Specify Name and Location screen type in the virtual machine Name and select the Location, then press Next
  5. On the Assign Memory screen enter the amount of Startup memory, then press Next
  6. On the Configure Networking screen select the External virtual network created earlier in Step 3, then press Next
  7. On the Connect Virtual Hard Disk screen select the Use an existing virtual hard disk option and browse to the location of the VHD created in Step 1
  8. On the Summary screen press Finish
  9. Select the newly created virtual machine in the Virtual Machines section, then bring up the Action > Settings… dialog for the VM
  10. Select the Processor node and increase the Number of virtual processors to the desired value, then press OK
  11. Make sure the VM is still selected in the Virtual Machines section, then use the Action > Start menu option to start the virtual machine
  12. In the Action menu, select Connect… to bring up the Virtual Machine Connection window
  13. Login to the VM
  14. Make sure that remote connections are allowed by going to Control Panel > Remote settings and making sure that one of the Allow connections options is selected

And that’s it! At this point you should be able to access the VM using either Hyper-V Virtual Machine Connection or Windows Remote Desktop Connection.

Quickly view any managed property value in SharePoint 2013 using Search REST API

Search REST API in SharePoint 2013 makes it very easy to quickly check the value stored in the search index for any managed property. For example, let’s say you have a SharePoint list and one of the custom columns in that list is a publishing image field. You need to display the image in search results but are not sure what type of value is stored in the search index. Is it an absolute url to the image? A relative url? Maybe an entire image HTML tag?

A quick way to check exactly what it is by using the Search REST API. First, let’s run a simple Search REST API query and see what managed property values are returned.

http://intranet.contoso.com/_api/search/query?querytext='contenttype:banner'

Since only standard managed properties are included by default, add the selectproperties parameter to the query.

http://intranet.contoso.com/_api/search/query?querytext='contenttype:banner'&selectproperties='BannerImageOWSIMGE'

Similar to querytext and selectproperties, many other KeywordQuery object model properties can be used as parameters for Search REST API calls.

Crawler Impact Rules in SharePoint 2010

In SharePoint 2010, you can control the content crawl rate at the search service application level by using Crawler Impact Rules. By default, the number of simultaneous requests changes dynamically based on the server hardware and utilization. Crawler impact rules are often used to throttle the request rate for external websites. You can manage crawler impact rules in Central Administration > Search Service Application > Crawler Impact Rules.

Let’s watch the Filtering Threads and Idle Threads from the OSS Search Gatherer category in Performance Monitor during a content crawl before any crawler impact rules are defined.

In my development VM, I see that the number of filtering threads stays at around 20 and the number of idle threads around 12 for the duration of the crawl which means that an average of 8 threads are being used by the gatherer process.

Next, let’s create a new crawler impact rule to limit the number of simultaneous requests to 2 using the * site name wildcard to apply the rule to all sites.

If we keep an eye on the performance counters this time, we can see that now the difference between the number of filtering and idle threads during a crawl equals to 2 (11 filtering threads and 9 idle threads in the example below).

The performance counters confirmed that our new crawler impact rule is working. Be careful when you delete a crawler impact rule though! I’ve seen it a number of times in different SharePoint farms that SharePoint remembers and keeps using the last deleted crawler impact rule. I verified it by monitoring the performance counters – the deleted crawler impact rule remains in effect until the the SharePoint Server Search 14 service is restarted (or a new rule is added that overrides the deleted rule settings). So remember – restart the SharePoint Server Search 14 windows service after deleting a crawler impact rule!

Using Content Enrichment Web Service Callout in SharePoint 2013 Preview

SharePoint 2013 Preview release intoduced a new functionality called content enrichment web service callout. It provides the ability to inspect and manipulate managed property values for each item before it’s added to the search index. Prior to SharePoint 2013, the only way to accomplish something similar was in FAST Search for SharePoint by extending the item processing pipeline. Clients using SharePoint server search were out of luck as the functionality was not available to them.

The process of building and configuring a web service callout is relatively straight forward. These are the high-level steps to follow:

  1. Build a web service by implementing the IContentProcessingEnrichmentService interface. Add logic to manipulate managed property values.
  2. Run PowerShell commands to configure the callout web service endpoint address, input and output managed properties, trigger condition and a few other things.
  3. Execute a full crawl.

In this blog post I’ll show an example of developing a web service that populates a new managed property value which is then used as a refiner on the search results page. Let’s say we have a number of project sites in SharePoint where each site contains information about a specific bike model.

Each bike model belongs to a product category such as Mountain Bikes, Road Bikes and Touring Bikes. We’d like to be able to refine search results by product category but unfortunately that metadata is not available in SharePoint at this point. What we are going to do next is create a new managed property called ProductCategory and build a web service to populate the managed property values based on our custom business logic. The ProductCategory managed property can then be used as a refiner on the search results page.

To create the managed property, navigate to Central Administration > Search Service Application > Search Schema > New Managed Property.

  • Property name: ProductCategory
  • Type: Text
  • Searchable: checked
  • Queryable: checked
  • Retrievable: checked
  • Refinable: Yes – active
  • Token Normalization: checked

In Visual Studio 2012, create the web service: New Project > Visual C# > WCF > WCF Service Application.

Delete the Service1 created by default or rename it to EnrichmentService. Delete the IService1 or IEnrichmentService interface.

Add an assembly reference to C:\Program Files\Microsoft Office Servers\15.0\Search\Applications\External\microsoft.office.server.search.contentprocessingenrichment.dll.

Open EnrichmentService.svc.cs, add the following using statements:

using Microsoft.Office.Server.Search.ContentProcessingEnrichment;
using Microsoft.Office.Server.Search.ContentProcessingEnrichment.PropertyTypes;

Replace the class implementation:

public class EnrichmentService : IContentProcessingEnrichmentService
{
    private Dictionary<string, string> productModels = new Dictionary<string, string>()
    {
        {"mountain-100", "Mountain Bikes"},
        {"mountain-500", "Mountain Bikes"},
        {"road-150", "Road Bikes"},
        {"road-450", "Road Bikes"},
        {"touring-1000", "Touring Bikes"},
        {"touring-2000", "Touring Bikes"}
    };

    public ProcessedItem ProcessItem(Item item)
    {
        ProcessedItem processedItem = new ProcessedItem();
        processedItem.ItemProperties = new List<AbstractProperty>();

        AbstractProperty pathProperty = item.ItemProperties.Where(p => p.Name == "Path").FirstOrDefault();
        if (pathProperty != null)
        {
            Property<string> pathProp = pathProperty as Property<string>;
            if (pathProp != null)
            {
                foreach (var productModel in productModels)
                {
                    if (pathProp.Value.Contains(productModel.Key))
                    {
                        Property<string> modelProp = new Property<string>()
                        {
                            Name = "ProductCategory",
                            Value = productModel.Value
                        };
                        processedItem.ItemProperties.Add(modelProp);
                    }
                }
            }
        }

        return processedItem;
    }
}

Now the web service is ready and the next step is to configure SharePoint to call the web service during the crawl. That is done using PowerShell. To minimize the performance impact of the web service callout, we only want it to be called under a certain condition – this condition is defined in the Trigger property. More information about the syntax can be found in the Trigger expression syntax article on MSDN. The expected input and output managed properties are configured via the InputProperties and OutputProperties. When debugging the web service, the DebugMode property value can be set to $true in which case SharePoint will ignore the InputProperties value and will send all available managed properties for each item to the service. Any managed property values returned by the web service in debug mode are ignored by SharePoint.

$ssa = Get-SPEnterpriseSearchServiceApplication
$config = New-SPEnterpriseSearchContentEnrichmentConfiguration
$config.DebugMode = $false
$config.Endpoint = "http://localhost:64401/EnrichmentService.svc"
$config.FailureMode = "WARNING"
$config.InputProperties = "Path"
$config.OutputProperties = "ProductCategory"
$config.SendRawData = $false
$config.Trigger = 'StartsWith(Path,"http://intranet.contoso.com/adventureworks/models/")'
Set-SPEnterpriseSearchContentEnrichmentConfiguration –SearchApplication $ssa –ContentEnrichmentConfiguration $config

Finally, launch the web EnrichmentService created earlier and start a new full crawl. Once the crawl is complete, the ProductCategory managed property should be populated and searchable:

The final step is to add a Product Category search refiner. Edit the search results page, edit the Refinement web part, click the Choose Refiners… button within the Properties for Search Refinement section, select the ProductCategory managed property in the Available refiners list and press the Add > button. Move the ProductCategory to the top of the Selected refiners list, then scroll down and set the Display name to Product Category and save your changes.

Run a search for “bike” and you should now be able to refine the search results by the product categories:

References:

Export Search Service Application Crawler Settings to PowerShell in SharePoint 2010

If you ever wanted to take a snapshot of your search service application crawler settings in SharePoint 2010 then you already know that there’s no easy way of doing it without writing custom code. Even if you initially deployed crawler settings to your SharePoint farm using PowerShell scripts, chances are that some settings have been updated manually and the current configuration no longer matches the original deployment scripts. The following PowerShell script exports the main properties of Content Sources, Crawl Rules and Server Name Mappings that exist within a search service application. It’s not complete by any means but can serve as a starting point to be customized and extended to match your specific requirements. One thing to highlight is that the script doesn’t simply export the current search crawler settings to a data file but it actually translates your configuration into PowerShell commands that can later be executed to restore crawler settings to the current state.

$ssaName = "FASTContent"
$searchApp = Get-SPEnterpriseSearchServiceApplication $ssaName

$filePath = "ContentSourcesExport.ps1"
"`$searchApp = Get-SPEnterpriseSearchServiceApplication `"$ssaName`"" | Out-File $filePath
Get-SPEnterpriseSearchCrawlContentSource -SearchApplication $searchApp | Foreach-Object {"New-SPEnterpriseSearchCrawlContentSource -SearchApplication `$searchApp -Name `"" + $_.Name + "`" -Type " + $_.Type + " -StartAddresses `"" + [System.String]::Join(",",$_.StartAddresses) + "`""} | Out-File $filePath -Append

$filePath = "CrawlRulesExport.ps1"
"`$searchApp = Get-SPEnterpriseSearchServiceApplication `"$ssaName`"" | Out-File $filePath
Get-SPEnterpriseSearchCrawlRule -SearchApplication $searchApp | Foreach-Object {"New-SPEnterpriseSearchCrawlRule -SearchApplication `$searchApp –Path `"" + $_.Path + "`" –CrawlAsHttp `$" + $_.CrawlAsHttp + " -Type " + $_.Type + " -FollowComplexUrls `$" + $_.FollowComplexUrls} | Out-File $filePath -Append

$filePath = "ServerNameMappingsExport.ps1"
"`$searchApp = Get-SPEnterpriseSearchServiceApplication `"$ssaName`"" | Out-File $filePath
Get-SPEnterpriseSearchCrawlMapping -SearchApplication $searchApp | Foreach-Object {"New-SPEnterpriseSearchCrawlMapping -SearchApplication `$searchApp -Url `"" + $_.Source + "`" -Target `"" + $_.Target + "`""} | Out-File $filePath -Append

The script below can be used to easily delete all of Content Sources, Crawl Rules and Server Name Mappings that exist within a given search service application.

$ssaName = "FASTContent"
$searchApp = Get-SPEnterpriseSearchServiceApplication $ssaName

Get-SPEnterpriseSearchCrawlContentSource -SearchApplication $searchApp | Remove-SPEnterpriseSearchCrawlContentSource

Get-SPEnterpriseSearchCrawlRule -SearchApplication $searchApp | Remove-SPEnterpriseSearchCrawlRule

Get-SPEnterpriseSearchCrawlMapping -SearchApplication $searchApp | Remove-SPEnterpriseSearchCrawlMapping

LinkedIn People Search Web Parts for SharePoint 2010

Earlier this week I created my first public repository on GitHub: LinkedIn people search web parts for SharePoint 2010. The project consists of a number of web parts that can be used to perform people search using LinkedIn JavaScript API, display the results and even refine the returned profiles similar to the way SharePoint people search works. It is a sandboxed solution since all of the functionality is client-side and is implemented in JavaScript/jQuery and currently contains the following web parts:

  • LinkedIn People Search Box
  • LinkedIn People Search Refinement
  • LinkedIn People Search Results
  • LinkedIn People Search Statistics

Follow the usage instructions to build a LinkedIn people search page that looks and feels like SharePoint people search and feel free to send me your feedback.

Revert customized master pages back to ghosted state in SharePoint 2010

When you first deploy master pages and page templates as part of a SharePoint 2010 solution package and then provision the deployed files to the master page gallery using a feature, the provisioned files start in a ghosted state and get automatically updated on every package deployment. What happens if someone makes manual changes to the provisioned files in SharePoint Designer or by uploading an updated version of the file to the master page gallery is that the edited pages get disconnected from the page version that is deployed to the file system by the SharePoint solution package and become customized, or unghosted. Any page changes deployed as part of the SharePoint solution package after that aren’t going to be reflected on the site until the pages are uncustomized and return back to the ghosted state. The process of reverting the customized files back to the ghosted state using the SharePoint UI usually involves deleting the file from the master page gallery and then reactivating the feature to provision the deployed file. This solution is not always possible or easy to do as there may be many pages that depend on the customized page template or sites using the customized master page and SharePoint UI won’t allow you to delete the file from the gallery if that’s the case. Luckily, there’s a simple way to accomplish the desired effect in PowerShell!

First, get a reference to the root SPWeb object for the site collection and check the customization status of the page:

Add-PSSnapIn Microsoft.SharePoint.PowerShell -ErrorAction SilentlyContinue

$web = Get-SPWeb http://intranet.contoso.com
$file = $web.GetFile("/_catalogs/masterpage/MyCustomMasterPage.master")
$file.CustomizedPageStatus

The possible page customization options are:

  • Uncustomized – the page is not customized and is in the ghosted state. No action is necessary.
  • Customized – the page has been customized and is currently in the unghosted state. This page can be reverted back to the ghosted state using the script below.
  • None – the page was never ghosted. This is often the case if the master page was uploaded to the master page gallery first and only then added to the SharePoint deployment package. The only solution here is to delete the file and reactivate the feature to provision the deployed version of the page.

The following script will revert any customized page back to the ghosted state:

if($file.CustomizedPageStatus -eq "Customized") {
    $file.RevertContentStream()
    $file.CustomizedPageStatus
}

At this point the page customization status will change to Uncustomized, the page will return back to the ghosted state and will be in sync with the page version deployed as part of the SharePoint deployment package.

Enable Query Suggestions in SharePoint 2010

The concept of query suggestions is already well described in the Manage query suggestions TechNet article. One thing you might have noticed is that query suggestions are only enabled by default in the Search Center site templates (available for both SharePoint Search and FAST Search) but are not enabled for the search box located in the page header of other standard SharePoint site templates. In this blog post I’m going to show how to override the default behavior and enable search query suggestions for sites created using the Team Site template without modifying the out-of-the-box master page.

First, let’s go ahead and create some query suggestions using the following PowerShell command:

$searchapp = Get-SPEnterpriseSearchServiceApplication -Identity "FASTQuery"

New-SPEnterpriseSearchLanguageResourcePhrase -SearchApplication $searchapp -Language En-Us -Type QuerySuggestionAlwaysSuggest -Name "M300 Digital Camera"
New-SPEnterpriseSearchLanguageResourcePhrase -SearchApplication $searchapp -Language En-Us -Type QuerySuggestionAlwaysSuggest -Name "M400 Digital Camera"
New-SPEnterpriseSearchLanguageResourcePhrase -SearchApplication $searchapp -Language En-Us -Type QuerySuggestionAlwaysSuggest -Name "M500 Digital Camera"
New-SPEnterpriseSearchLanguageResourcePhrase -SearchApplication $searchapp -Language En-Us -Type QuerySuggestionAlwaysSuggest -Name "X200 Digital Camera"
New-SPEnterpriseSearchLanguageResourcePhrase -SearchApplication $searchapp -Language En-Us -Type QuerySuggestionAlwaysSuggest -Name "X250 Digital Camera"
New-SPEnterpriseSearchLanguageResourcePhrase -SearchApplication $searchapp -Language En-Us -Type QuerySuggestionAlwaysSuggest -Name "Z500 Digital Camera"

Start-SPTimerJob -Identity "Prepare query suggestions"

Once the timer jobs completes, we should see query suggestions in the search center:

But what about the standard site pages? Well, the query suggestions are disabled there by default. Next, we are going to build a new site collection feature that turns the query suggestions on for the entire site collection.

Let’s go ahead and create a new empty SharePoint 2010 project in Visual Studio 2010 and add a new site collection feature.

Now we need to add a new Empty Element item to the project and populate the Elements.xml file with the following content:

<?xml version="1.0" encoding="utf-8"?>
<Elements xmlns="http://schemas.microsoft.com/sharepoint/">
	<Control
		Id="SmallSearchInputBox"
		Sequence="24"
		ControlClass="Microsoft.SharePoint.Portal.WebControls.SearchBoxEx"
		ControlAssembly="Microsoft.Office.Server.Search, Version=14.0.0.0, Culture=neutral, PublicKeyToken=71e9bce111e9429c">
		<Property Name="GoImageUrl">/_layouts/images/gosearch15.png</Property>
		<Property Name="GoImageUrlRTL">/_layouts/images/gosearchrtl15.png</Property>
		<Property Name="GoImageActiveUrl">/_layouts/images/gosearchhover15.png</Property>
		<Property Name="GoImageActiveUrlRTL">/_layouts/images/gosearchrtlhover15.png</Property>
		<Property Name="UseSiteDefaults">true</Property>
		<Property Name="FrameType">None</Property>
		<Property Name="ShowAdvancedSearch">false</Property>
		<Property Name="DropDownModeEx">HideScopeDD_DefaultContextual</Property>
		<Property Name="UseSiteDropDownMode">true</Property>
		<Property Name="ShowQuerySuggestions">True</Property>
	</Control>
</Elements>

Your project structure at this point should be similar to the screenshot below:

Build and deploy the solution package and activate the site collection feature. Start typing the search query and you should see the query suggestions now but it’s obvious that the out-of-the-box SharePoint styles don’t work properly in this case:

In order to resolve this style issue we have to override a couple of the SharePoint styles. Start by right-clicking the project in Solution Explorer, then going to Add -> SharePoint “Layouts” Mapped Folder. Then add a new css file with the following content:

.s4-search INPUT {
	FLOAT: none !important
}
.s4-rp DIV {
	DISPLAY: block !important
}

The last step is to add the new css file reference to the SharePoint master page. We’ll do it by updating the existing Elements.xml to add a custom CssRegistration to AdditionalPageHead. Here’s the final Elements.xml file content and project structure:

Deploy the solution package once again and check out the query suggestions styling now – everything should look and work as expected now:

References:

  1. Manage query suggestions (SharePoint Server 2010)