Azure Event Hubs and Amazon Kinesis Side by Side

Azure Event Hubs and Amazon Kinesis are two competing cloud services that serve the same purpose – reliably collect and process massive amounts of data with low latency and at low cost. Although both services provide similar functionality, there are significant differences to be aware of when architecting a solution. This article compares various aspects of Azure Event Hubs and Amazon Kinesis and is intended to assist in the software architecture decision-making process.

Key concepts

Amazon Kinesis streams use shards as the base throughput units. Each shard provides a capacity of 1MB/sec data input and 2MB/sec data output, supports up to 1,000 PUT records and up to 5 read transactions per second. The default shard limit depends on a region and is either 25 or 50 shards per region but you can request an increase. There is no upper limit to the number of shards in a stream or account.

Azure Event Hubs stream throughput capacity is controlled by throughput units. One throughput unit includes up to 1MB/sec ingress, up to 2MB/sec egress, and supports 1,000 events per second. Event Hubs also introduce a concept of partitions – a data organization mechanism designed to support multiple concurrent readers. A single partition has a maximum scale of one throughput unit. There’s a default limit of 20 throughput units per Azure account and 32 partitions per Event Hub but both limits can be increased by request.

Data input

Amazon Kinesis API uses HTTPS protocol for all operations. Every put request must be signed using an access key. You can control the level of access to Amazon Kinesis resources using AWS Identity and Access Management (IAM). IAM policies that only allow write operations to specific streams can be used to add data records. Data producers can also use the Amazon Kinesis Producer Library (KPL) to simplify producer application development. The maximum size of a data blob (the data payload before Base64-encoding) is 1MB.

Azure Event Hubs support HTTPS and AMQP 1.0 protocols for event publishing. Event publishers use Shared Access Signature (SAS) tokens for authentication. SAS tokens for event publishers can be created with send-only privileges on a specific Event Hub. .NET developers can take advantage of the EventHubClient for publishing events to Event Hubs and Apache Qpid project can be used for sending messages over AMQP from a variety of platforms and languages. You can send up to 256KB of event data in a single request. Publisher policies is a distinctive feature of Azure Event Hubs that is designed to facilitate large numbers of independent event producers.

Data processing

Amazon Kinesis consumer applications can read data from streams using either Amazon Kinesis API or Amazon Kinesis Client Library (KCL). Amazon Kinesis Client Library (KCL) makes it easier to build robust applications that read and process stream data by handling complexities typically associated with distributed stream processing. Amazon Kinesis Connector Library helps you integrate Amazon Kinesis with other AWS services and third-party tools and provides connectors to Amazon DynamoDB, Amazon Redshift, Amazon S3, and Elasticsearch. Amazon Kinesis Storm Spout library helps Java developers integrate Amazon Kinesis with Apache Storm.

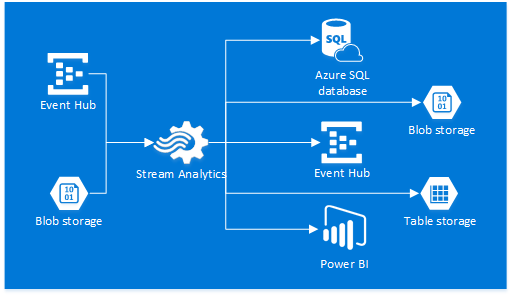
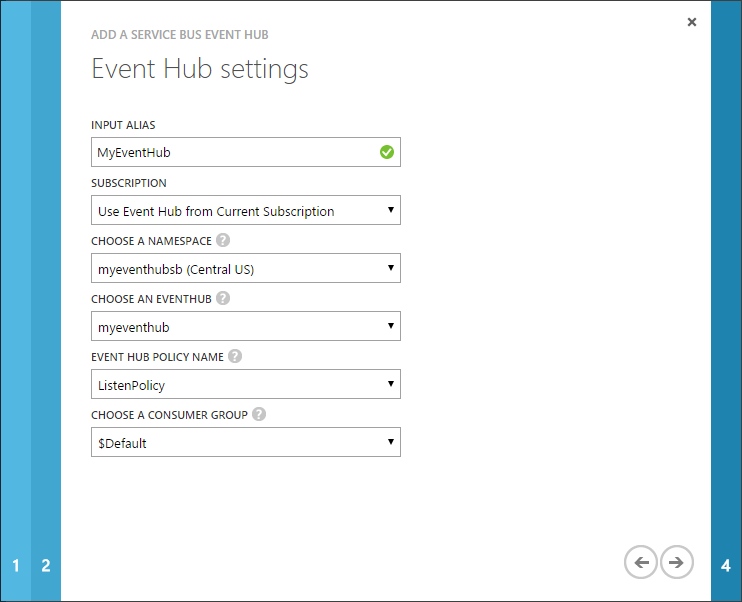
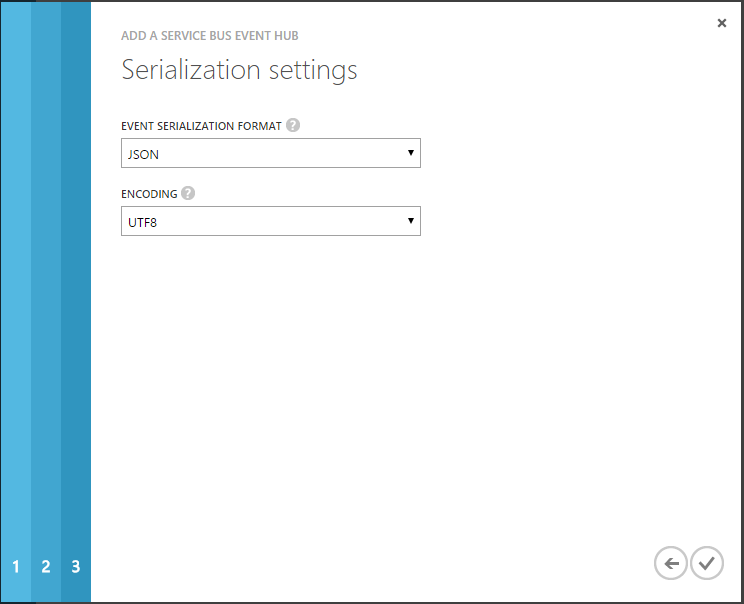
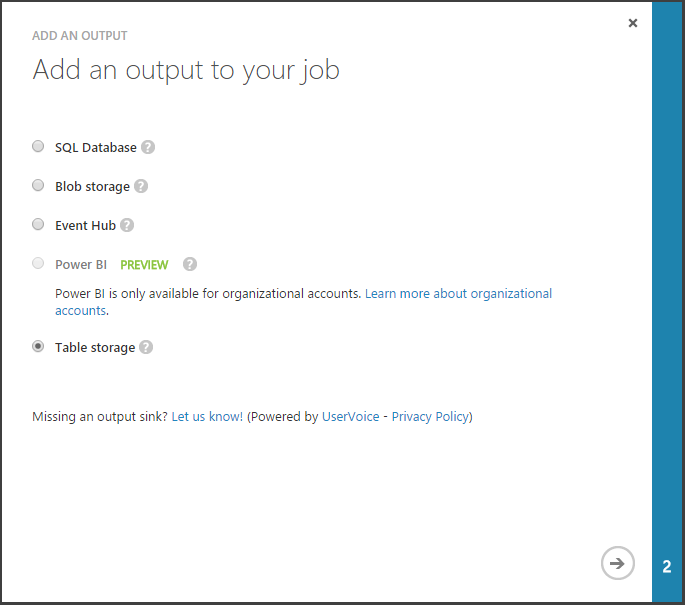
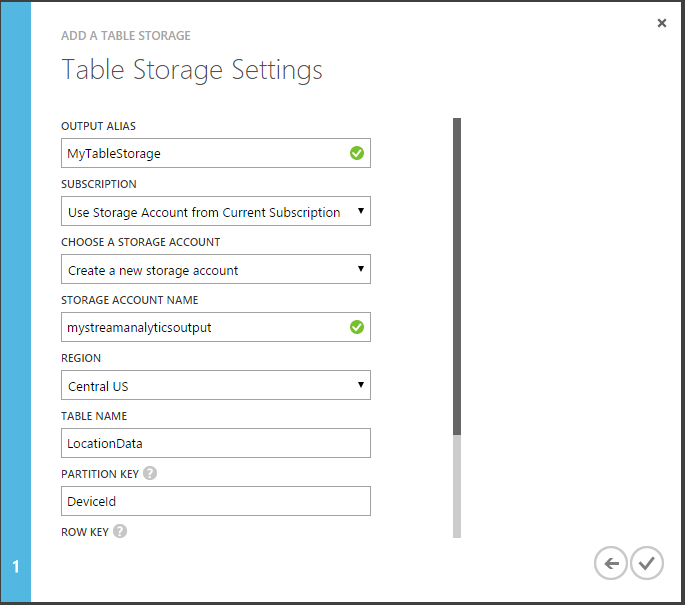
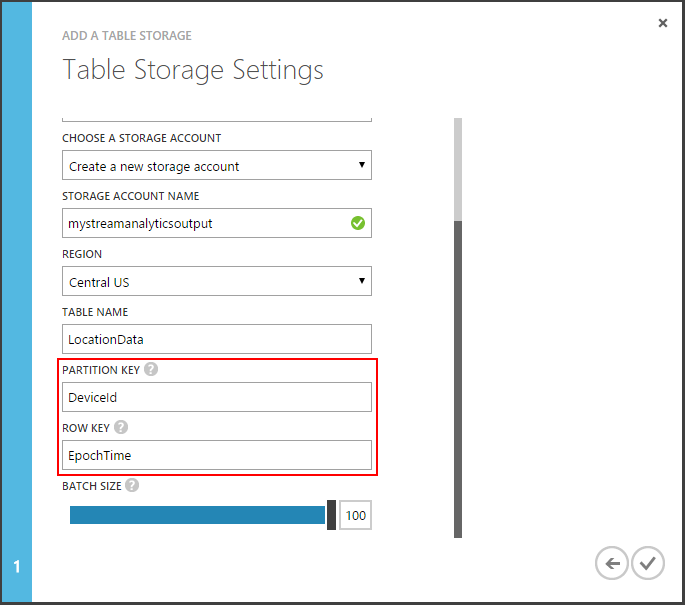
Azure Event Hubs consumers connect via the AMQP 1.0 session, in which events are delivered as they become available. Consumer groups allow multiple consuming applications to read the same stream independently at their own pace. You can create up 20 consumer groups per Event Hub. The EventProcessorHost class can significantly simplify distributed partition processing for .NET clients. Azure Steam Analytics service provides out-of-the-box integration with Event Hubs and can be used to process ingested events in real-time. Stream Analytics supports Azure SQL database, Blob storage, Event Hub, Table storage, and Power BI output sink options.

Monitoring

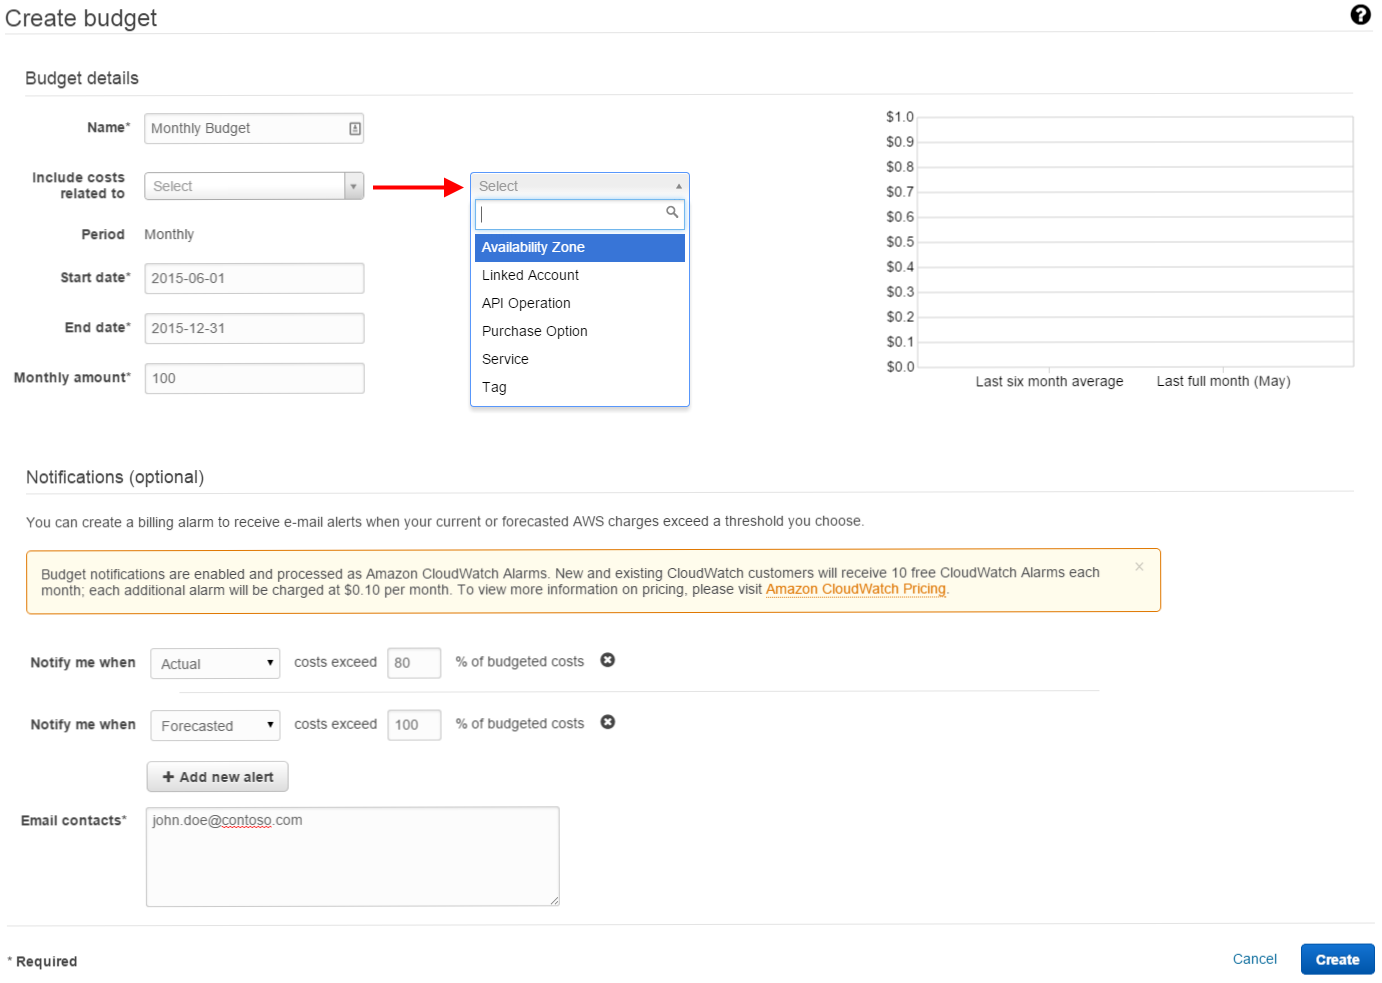
Amazon Kinesis integrates with Amazon CloudWatch service which is a reliable, scalable, and flexible monitoring solution that enables you to collect, view, and analyze CloudWatch metrics for your Amazon Kinesis streams.

Azure Event Hubs don’t provide a built-in monitoring and notification mechanism beyond the basic metrics available on the Azure management portal at the time of writing.

Capacity management

Amazon Kinesis stream throughput is limited by the number of shards within the stream. A resharding operation must be performed in order to increase (split) or decrease (merge) the number of shards. Stream data records are accessible for a maximum of 24 hours from the time they are added to the stream.

Azure Event Hubs ingress is throttled and egress is limited to the amount of capacity provided by the number of throughput units assigned to the stream. Throughput units are provisioned on a best effort basis and may not always be available for immediate purchase. The default Event Hubs message retention period is 24 hours but the Event Hubs Standard tier supports a maximum retention period of 7 days.

Pricing

Amazon Kinesis uses simple pay as you go pricing and is based on two dimensions: Shard Hour and PUT Payload Unit (25KB payload chunk). The pricing varies by region and is $0.015/hr per shard and $0.014 per 1,000,000 PUT payload units in the US East.

Azure Event Hubs use tiered pricing model and charge by the number of assigned throughput units and ingress events (units of data 64KB or less). The Event Hubs Basic tier costs $0.015/hr per throughput unit and $0.028 per million events while the Event Hubs Standard costs $0.03/hr per throughput unit and $0.028 per million events in the Central US region. Service Bus brokered connections (AMQP connections) are billed separately but the first 100 concurrent connections are free for every Basic Event Hubs namespace, and the first 1,000 concurrent connections per subscription are free for Standard Event Hubs.

Additional resources

Amazon API Gateway and AWS Lambda – Better Together

Modern application development extensively relies on REST APIs. You can hardly find a client application that doesn’t require backend services, and REST protocol is a popular choice because of simplicity and wide platform support. Things start to get complicated when you deploy the REST API to the public domain. Now you have to worry about maintenance, scalability, security, and other responsibilities that come with hosting a publicly accessible web service. Many times these APIs aren’t very complex and don’t require much business logic so the service maintenance overhead can be very significant relative to the overall service functionality. A combination of Amazon API Gateway and AWS Lambda services can significantly reduce the complexities typically associated with hosting and managing your REST APIs.

AWS Lambda service introduction

AWS Lambda is a managed compute service that executes your application code units (referred to as Lambda functions) triggered programmatically or in response to various events raised by other AWS services. Some of the key features of AWS Lambda are:

  • Fully managed – there’s no infrastructure to manage. Simply upload the code and let AWS Lambda take care of the rest.
  • Scalability and high availability – AWS Lambda automatically scales and manages compute resources across multiple Availability Zones.
  • Cost efficiency – only pay for the time your code actually runs, in 100ms increments.
  • Compatibility – currently supports Node.js and Java programming languages.

Amazon API Gateway service introduction

Amazon API Gateway is a fully managed application service that acts as a frontend to your REST APIs and handles traffic management, authorization and access control, monitoring, and API version management. Amazon API Gateway can also generate client SDKs from your REST API for popular development languages and platforms such as JavaScript, iOS and Android. The cost model is very simple and you only pay for the number of your API calls and data transfer out.

Amazon API Gateway and AWS Lambda

As you can see, these services can already be very useful on their own but they also complement each other greatly. Amazon API Gateway tightly integrates with AWS Lambda and allows developers to implement truly serverless REST APIs. Amazon API Gateway endpoints can be configured to invoke AWS Lambda functions which makes it possible to build and deploy publicly accessible, secure, scalable, and reliable REST APIs backed by Node.js or Java code of practically any complexity without having to worry about the infrastructure.

Additional resources

Simplify Real-Time Event Processing with Azure Stream Analytics

Scalable and reliable real-time event processing has never been a simple task. Software architects and developers involved in such projects often spend the majority of their time focusing on building custom solutions to satisfy the reliability and performance requirements of the applications and significantly less time on the actual business logic implementation. The introduction of cloud services made it easier to scale real-time event processing applications but it still requires complex solutions to properly distribute the application load across multiple worker nodes. For example, EventProcessorHost class provides a robust way to process Event Hubs data in a thread-safe and multi-process safe manner but you are still responsible for hosting and managing the worker instances. Wouldn’t it be nice not having to worry about the event processing infrastructure and focus on the business logic instead?

Azure Stream Analytics service introduction

Azure Stream Analytics is a fully managed, scalable and highly available real-time event processing service capable of handling millions of events per second. It works exceptionally well in combination with Azure Event Hubs and enables the 2 main scenarios:

  1. Perform real-time data analytics and immediately detect and react to special conditions.
  2. Save event data to persistent storage for archival or further analysis.

Each stream analytics job consists of one or more inputs, a query, and one or more outputs. At the time of writing the available input sources are Event Hubs and Blob storage, and the output sink options consist of SQL Database, Blob storage, Event Hubs, Power BI and Table storage. Pay special attention to the Power BI output option (currently in preview), which allows you to easily build real-time Power BI dashboards. The diagram below provides a graphical representation of the input and output options available.

Azure Stream Analytics Diagram
Figure 1 – Azure Stream Analytics input and output options

The queries are built using a Stream Analytics Query Language – a SQL-like query language specifically designed for performing transformations and computations over streams of events.

Step-by-step Event Hub data archival to Table storage using Azure Stream Analytics

For this walkthrough, let’s assume that there’s an Event Hub called MyEventHub and it receives location data from connected devices in the following JSON format:

{ "DeviceId": "mwP2KNCY3h", "EpochTime": 1436752105, "Latitude": 41.881832, "Longitude": -87.623177 }
  1. Navigate to the Azure management portal and create a new Stream Analytics job.Create Stream Analytics job
  2. Open the MyStreamAnalytics job and add a new Event Hub input.
    Add Event Hub input
  3. Configure the Event Hub settings.
    Configure Event Hub settings
  4. Keep the default serialization settings.
    Configure Event Hub serialization settings
  5. Add a new Table storage output.
    Add Table storage output
  6. Configure the Table storage settings.
    Configure Table storage settings
  7. Use the DeviceId field as PartitionKey and EpochTime as Row Key.
    Configure Table storage Partition Key and Row Key
  8. Adjust the query to use the correct input and output alias names.
    Configure Azure Stream Analytics query
  9. Finally, start the job and watch your output storage table get populated with the Event Hub stream data without writing a single line of code!

Additional resources

Azure Event Hub Message Publishing from Connected Devices

Building an application for a connected device like a mobile phone, tablet, or a microcomputer is easier than ever these days. A variety of tools and supported programming languages allow developers to quickly build applications that collect sensor data, capture telemetry information or location data, and send the collected information to backend services for processing.

Connected devices communication challenges

A functional prototype can often be built in a matter of days or even hours but a number of challenges arise and must be addressed in order to prepare the application for a wider distribution. Some of the most common challenges are:

  1. Platform support – applications running on various platforms must be able to send information.
  2. Reliability – the backend service must be able to reliably accept information.
  3. Security – only authorized devices should be able to send information and the information must be protected from unauthorized access and manipulation.
  4. Latency – the network calls must be as quick as possible to avoid network interruptions, preserve system resources and battery power.
  5. Scalability – in many cases, the backend service must be able to handle massive amounts of data.

It is obviously possible to build a custom solution that satisfies all of your application-specific requirements but would it bring you any business value or would you rather focus on the actual application functionality? Luckily, there are cloud services specifically designed for these types of scenarios, and they can significantly simplify your development efforts.

Azure Event Hubs service introduction

Meet Azure Event Hubs – a highly scalable, low latency and high availability event ingestor service capable of reliably handling millions of events per second and buffering them for further processing for anywhere from 24 hours up to 7 days. The service supports HTTP and AMQP protocols which makes it an attractive option for a wide variety of devices and platforms.

The Event Hubs REST API is pretty straight-forward and easy to use. Simply submit an HTTP POST request to your event hub endpoint and set the request body to a JSON-encoded string that contains one or more messages. For example, below is a sample Send Event request, courtesy of Event Hubs REST API Reference on MSDN.

POST https://your-namespace.servicebus.windows.net/your-event-hub/messages?timeout=60&api-version=2014-01 HTTP/1.1
Authorization: SharedAccessSignature sr=your-namespace.servicebus.windows.net&sig=tYu8qdH563Pc96Lky0SFs5PhbGnljF7mLYQwCZmk9M0%3d&se=1403736877&skn=RootManageSharedAccessKey
Content-Type: application/atom+xml;type=entry;charset=utf-8
Host: your-namespace.servicebus.windows.net
Content-Length: 42
Expect: 100-continue

{ "DeviceId":"dev-01", "Temperature":"37.0" }

Generating a request like this should not require much effort in any programming language on any platform, be it a mobile app or a Node.js application running on a Raspberry Pi. The only part that deserves special attention is the Authorization request header. The Authorization header contains a Shared Access Signature (SAS) token that can be generated by any client that has access to the signing key specified in the shared access authorization rule. Below are some of the best practices to follow when generating SAS tokens for connected devices.

Azure Event Hubs SAS token generation best practices

  1. Never use the RootManageSharedAccessKey shared access policy to generate SAS tokens for your connected devices since it’s a highly privileged policy. Follow the principle of least privilege and always create a new policy with Send-only permission for each event hub.
  2. Never send or store your policy keys on connected devices as it may expose your keys for unauthorized access and makes it difficult to rotate or revoke them. Always generate your SAS tokens on the server and only store the generated tokens on the devices.
  3. Never generate SAS tokens and submit HTTP POST requests to the common event hub URI as the same SAS token would be valid for any device. Always target unique device-specific event hub endpoints when generating tokens and publishing events.

Additional resources

AWS Budgets Feature Overview

Earlier this week, Amazon Web Services announced AWS Budgets – a new feature you can use to track your monthly AWS spending and, optionally, receive SNS notifications when certain spending thresholds are reached. Unlike CloudWatch billing alarms – the only cost monitoring and notification feature previously available, the new AWS Budgets are much more flexible and allow you to slice the costs by service, tag, availability zone, and other dimensions.

I’m sure that many developers will appreciate and take advantage of the new feature to manage costs of their Dev and Test environments. Similarly, many organizations will gain more visibility into their AWS spending across all linked accounts and will be able to proactively address unexpected service usage charges.

You can create a new AWS Budget in the Billing & Cost Management section of the AWS Management Console. Below is a screenshot of a sample budget configuration that would trigger an email alert when the actual usage costs exceed 80% or when the forecasted costs exceed 100% of the monthly budget amount (Figure 1). The “Include costs related to” option lets you narrow down the scope to a specific Availability Zone, Linked Account, API Operation, Purchase Option, Service, or Tag.

Figure 1 - create budget
Figure 1 – create budget

Additional resources

Amazon Web Services Tips for Developers and Solutions Architects

Amazon Web Services (AWS) provides a full range of services that allow developers and solutions architects to design and build scalable and fault tolerant applications without a large up-front hardware investment. There’s a vast amount of information about what AWS has to offer available online but the following features are worth mentioning again.

  • AWS Free Tier: included services and limits, billing alerts
  • AWS Accounts and IAM Users: quick overview and best practices
  • AWS EC2: IAM Roles for EC2, Instance Metadata and User Data
  • AWS S3: Lifecycle rules and Amazon Glacier
  • AWS Architecture Center: reference architectures, architecture whitepapers and official icons

AWS Free Tier

AWS Free Tier allows you to use most of the core AWS services free of charge for 12 months. As of August 2014, these services include, but are not limited to:

  • Amazon EC2 – resizable compute capacity in the Cloud. 750 hours of t2.micro instance usage per month.
  • Amazon S3 – highly scalable, reliable, and low-latency data storage infrastructure. 5 GB of Standard Storage, 20,000 Get Requests and 2,000 Put Requests.
  • AWS Trusted Advisor – AWS Cloud Optimization Expert. 4 best-practice checks on performance and security. Notification and customization features.
  • Amazon Mobile Analytics – fast, secure mobile app usage analytics. 100 Million free events per month.
  • Amazon Cognito – mobile user identity and synchronization. Unlimited user authentication and ID generation. 10 GB of cloud sync storage. 1,000,000 sync operations per month.
  • Amazon DynamoDB – fully managed NoSQL database service with seamless scalability. 100 MB of storage, 5 Units of Write Capacity and 10 Units of Read Capacity.

Additional information about the free AWS offerings can be found on AWS Free Tier page.

Keep in mind that not all of the AWS services are included in the free usage tier so it’s very easy to accidentally start accumulating balance while exploring the various AWS services. Billing alarms can be used to generate notification emails once your account balance reaches a certain threshold to avoid unexpected billing charges.

AWS Accounts and IAM Users

It’s tempting to start using your new AWS account (email address and password combination) to access the AWS resources but that goes against the AWS security best practices. AWS Identity and Access Management (IAM) users and groups should be used to manage access to AWS resources. Here’s a quick summary that describes each of these account types:

  • AWS account – this is the account you create when you sign up for AWS and it represents a business relationship with AWS. AWS accounts have root permissions to all AWS resources and services and should not be used for day-to-day interactions with AWS.
  • IAM users – can be a person, service, or application that needs access to your AWS resources. Best practice is to create IAM users and assign them individual security credentials needed to access AWS services and resources. You can also create an IAM user for yourself, grant it administrative privileges, and use that IAM user to access the AWS management console or the APIs.

For more details, refer to the IAM Best Practices article and the AWS Security Best Practices whitepaper.

AWS EC2

It may be challenging to securely distribute and rotate AWS credentials used by your EC2 instances to communicate with other AWS services and resources. In a typical application, the AWS access keys are included in the application configuration file which means that they are visible to anyone who has access to the EC2 instance and makes it difficult to rotate the credentials on a regular basis when you have a large number of running EC2 instances. IAM Roles were designed specifically to address this problem and they let you delegate permissions to your EC2 instances to make API requests without the need to manage security credentials at the application level.

You can read more about AWS IAM Roles in the IAM Roles for Amazon EC2 article.

In addition to AWS credentials, your application may need to retrieve additional information about the EC2 instance it’s running on. For example, when logging application errors you may want to also include the EC2 instance ID or the AMI ID used to launch the instance. Another common requirement is passing configuration information to a newly launched EC2 instance. AWS offers an elegant solution for these problems called Instance Metadata and User Data. The instance metadata is organized in categories and is accessible from within the instance via the following URL: http://169.254.169.254/latest/meta-data

To get the instance AMI ID, simply call http://169.254.169.254/latest/meta-data/ami-id or call http://169.254.169.254/latest/meta-data/hostname to get the hostname of the current EC2 instance.

To retrieve user data available to the instance, use the following URL: http://169.254.169.254/latest/user-data

To learn more about, visit the Instance and Metadata and User Data page.

AWS S3

AWS Simple Storage Service (S3) is a well-known cloud file storage service. One of the lesser known features of Amazon S3 is the ability to auto archive content to Amazon Glacier, an extremely low cost cloud archive service optimized for infrequently accessed data. Content archival is controlled by Lifecycle rules that enable you to ensure that data is automatically stored on the cloud storage option that is most cost-effective for your needs. Be aware that Amazon Glacier is not currently available on the AWS Free Tier.

For more information, please visit the Amazon Glacier section of the Amazon S3 FAQs article.

AWS Architecture Center

AWS Architecture Center is the go-to place to find the guidance and best practices necessary to build highly scalable and reliable applications on the AWS platform. Some of the highlights are:

  • AWS Reference Architectures – single-page datasheets that provide you with the architectural guidance on how to take full advantage of AWS services.
  • Architecture Whitepapers from AWS – offers in-depth articles that focus on particular concepts such as fault-tolerance or security best practices in the AWS Cloud. SharePoint 2013 on AWS whitepaper will teach you how to deploy SharePoint 2013 on AWS, following best practices for deploying a secure and highly available architecture across multiple Availability Zones.
  • AWS Simple Icons – an official icon set that includes icons for several AWS products and resources. Available in MS PowerPoint, MS Visio and SVG and EPS formats.

Search Engine Optimization in SharePoint 2013 – SEO Properties

The web content management infrastructure in SharePoint 2013 includes a number of significant improvements targeted at search engine optimization for publishing sites. Major features such as cross-site publishing and managed navigation have been definitely getting a lot of attention but there are also smaller and less known features that can also be very useful.

Page SEO Properties

The Page content type in SharePoint 2013 has a number of fields dedicated to search engine optimization. You can populate these fields by selecting the Edit SEO Properties menu item in the SharePoint ribbon while editing a page.
SharePoint 2013 Edit SEO Properties ribbon menu item

On the Edit SEO Properties page, you can set the following field values:

  • Name – the page name to appear in search results. Defines the “canonical” url of the page. (Note: for term-driven pages, this maps to the Friendly Url Segment term property)
  • Title – the page title to appear in search results. Defines the HTML title tag value of the page. (Note: for term-driven pages, this maps to the Navigation Node Title term property)
  • Browser Title – if set, overrides the browser page title and HTML title tag value above.
  • Meta Description – short summary of page content. Search engines may display this in search results. Defines the “description” meta tag content of the page.
  • Meta Keywords – keywords that describe the content of the page. Defines the “keywords” meta tag content of the page.
  • Exclude from Internet Search Engines – indicates to search engines if this page content should be indexed or not. If the page is to be excluded, adds a noindex robots meta tag to the page.

SharePoint Cross-Site Publishing and Search Engine Optimization

The SEO Properties above work great for standard publishing pages but what if you are using cross-site publishing to display content on the publishing site? It turns out that you can also control the Browser Title, Meta Description and Meta Keywords tag content through search. The Catalog-Item Reuse web part that is typically used to display information on catalog item pages will use the following managed property values to generate meta tags for the page:

  • SeoBrowserTitleOWSTEXT – value will be used to populated the <title> tag
  • SeoKeywordsOWSTEXT – will populate the “keywords” meta tag
  • SeoDescriptionOWSTEXT – will set the “description” meta tag content

Basically, all you need to do is to map the crawled properties associated with your site columns to the managed properties above, run a full crawl and the meta tag will magically appear on your catalog item pages!

References

Canonicalization: https://support.google.com/webmasters/answer/139066?hl=en
Site title and description: https://support.google.com/webmasters/answer/35624?hl=en
Using meta tags to block access to your site: https://support.google.com/webmasters/answer/93710?hl=en

Business Connectivity Services, External Content Types and Content By Search in SharePoint 2013 – Part 2

In this blog post I’ll show how to surface data from external systems in SharePoint 2013 using Managed Navigation and Content By Search web parts. For instructions on how to crawl external systems using BCS, External Content Types and SharePoint Search, refer to my previous blog post: Business Connectivity Services, External Content Types and Content By Search in SharePoint 2013 – Part 1.

Managed Properties

In order for us to be able to use different Product and ProductModel external content type fields, we need to create a number of managed properties. For this example, the following managed properties need to be created:

  1. Navigate to Central Administration > Manage service applications > Search Service Application
  2. Click the Search Schema link in the Queries and Results side navigation section
  3. Click New Managed Property to create a new managed property for each of the items below
  4. ProductModelSummary
            • Name: ProductModelSummary
            • Type: Text
            • Searchable: True
            • Retrievable: True
            • Safe: True
            • Crawled property mapping: vProductModelCatalogDescriptionRead
              ListElement.Summary
  5. ProductModel
    • Name: ProductModel
    • Type: Text
    • Searchable: True
    • Queryable: True
    • Retrievable: True
    • Safe: True
    • Crawled property mapping: vProductAndDescriptionRead
      ListElement.ProductModel
  6. ProductDescription
    • Name: ProductDescription
    • Type: Text
    • Searchable: True
    • Retrievable: True
    • Safe: True
    • Crawled property mapping: vProductAndDescriptionRead
      ListElement.Description
  7. CultureID
    • Name: CultureID
    • Type: Text
    • Queryable: True
    • Safe: True
    • Crawled property mapping: vProductAndDescriptionRead
      ListElement.CultureID
  8. ProductID
    • Name: ProductID
    • Type: Integer
    • Queryable: True
    • Safe: True
    • Crawled property mapping: vProductAndDescriptionRead
      ListElement.ProductID
  9. Click the Content Sources link in the Crawling side navigation section
  10. Start Full Crawl for the AdventureWorks2012 content source

Result Sources

The next step is to create two new result sources on the publishing site that we can use later to configure content search web parts.

  1. On the publishing site, navigate to Site Settings > Search Result Sources
  2. Click New Result Source to create each of the result sources below
  3. Product
    • Name: Product
    • Query Transform: {searchTerms} contentsource:AdventureWorks2012 entityname:Product cultureid:en
  4. ProductModel
    • Name: ProductModel
    • Query Transform: {searchTerms} contentsource:AdventureWorks2012 entityname:ProductModel

Site Navigation

Now let’s confirm that managed navigation is enabled and configured on the SharePoint site. It is enabled for new publishing sites by default in SharePoint 2013.

  1. Navigate to Site Settings > Look and Feel > Navigation
  2. Make sure that Managed Navigation is selected for both Global Navigation and Current Navigation

Pages

We’ll need to create 3 new pages on the site – one top-level page listing all product models, one page that will list all products for a product model, and one page to display product details.

The first page has to be created by using the Site Actions > Add a page option so that SharePoint automatically creates and configures the navigation term.

  1. Create a new page called Products by going to Site Actions > Add a page
  2. Navigate to the Pages document library on the site
  3. Create a new page called Product by using the New Document option in the ribbon
  4. Create a new page called Product-Model by using the New Document option in the ribbon

Managed Navigation

Now is the time to configure the managed navigation to use the pages created earlier.

  1. Navigate to Site SettingsSite Administration > Term store management
  2. Expand the Site Collection node
  3. Expand the Site Navigation node
  4. Select the Products term
  5. Select the Term-Driven Pages tab
  6. Change target page for children of this term
  7. Change Catalog Item Page for this category and Change Catalog Item Page for children of this category to use the Product.aspx page
  8. Press Save to commit the changes
  9. Add a child term to the Products navigation term for each of the product model. No settings need to be customized for the child terms.
    • Mountain-100
    • Mountain-500
    • Road-150
    • Road-450
    • Touring-1000
    • Touring-2000

The navigation term set should now looks similar to this:
SiteNavigation

Content By Search

The final steps is to add and configure content search web parts to the pages we created earlier.

  1. Click the Products link in the global navigation to navigate to the Products.aspx page
  2. Edit the page and add a Content Search web part from the Content Rollup category
  3. Edit web part properties
  4. Press Change Query to bring up the Query Builder user interface
    1. On the Basics tab, switch to Advanced Mode, select ProductModel result source in the dropdown and clear the Query text
    2. Press OK to close the query builder
  5. Change the Number of items to show to 6
  6. In the Display Templates section, select Two lines as the Item display template
  7. In the Property Mappings section, select ProductModelSummary as Line 2
  8. Press OK to apply changes and save the page

The Products page should now look like this:
Products

Next, click one of the links on the page to navigate to the product model page.

  1. Edit Product-Model.aspx page
  2. Add a Content Search web part from the Content Rollup category
  3. Edit web part properties
  4. Press Change Query to bring up the Query Builder user interface
    1. On the Basics tab, switch to Advanced Mode, select Product result source in the dropdown
    2. Set Query text to productmodel:{Term.Name}
    3. Press OK to close the query builder
  5. Change the Number of items to show to 10
  6. In the Display Templates section, select Two lines as the Item display template
  7. Press OK to apply changes and save the page

Your Product Model page should now look similar to this screenshot:
Product-Model

Now follow one of the links on the page to navigate to the product detail page.

  1. Edit Product.aspx page
  2. Add Catalog-Item Reuse web part from the Search-Driven Content category
  3. Edit web part properties
  4. Press Change Query to bring up the Query Builder user interface
    1. On the Basics tab, switch to Advanced Mode, select Product result source in the dropdown
    2. Set Query text to productid:{URLToken.1}
    3. Press OK to close the query builder
  5. In the Property Mappings section, select ProductDescription managed property
  6. Press OK to apply changes and save the page

Finally, the Product page should look like this:
Product

Business Connectivity Services, External Content Types and Content By Search in SharePoint 2013 – Part 1

SharePoint 2013 makes it very easy to index data from external systems using Business Connectivity Services (BCS) and then to surface that data in SharePoint by taking advantage of the new Content By Search web part and Managed Navigation. In this blog post you’ll find step-by-step instructions on how to create External Content Types optimized for search and index data from external systems. My next blog post will build on top of that and will show how to configure Managed Navigation and Content By Search web parts to retrieve and display the external system data on a SharePoint site.

External System

In this example I’ll be using a copy of the AdventureWorks 2012 database from Codeplex. You can download the SQL Server 2012 OLTP version of the database here: http://msftdbprodsamples.codeplex.com/

External Content Types

We’ll need to create two external content types based on the database entities – Product and ProductModel.

  1. Launch Microsoft SharePoint Designer 2013.
  2. Open the SharePoint site where would you like to create the External Content Types.
  3. Select External Content Types in the left Site Objects pane and press the New External Content Type button in the ribbon.
  4. Set the Name to Product.
  5. Click the link next to the External System to bring up the Operation Designer.
  6. Press Add Connection, select SQL Server and configure the Connection Properties.
  7. In the Data Source Explorer, expand AdventureWorks2012 > Views.
  8. Generate the New Read Item Operation and New Read List Operation for vProductAndDescription view by right-clicking it. Map the ProductID column to Identifier.
  9. Save changes.
  10. Navigate back to the External Content Types screen and click the Product name to bring the content type back up.
  11. In the Fields section, select the Name field and press Set as Title in the ribbon. This will ensure that the Name field will appear as the title of the record in search results.
  12. Save changes.
  13. Repeat the steps above to create the ProductModel external content type. Use the vProductModelCatalogDescription view, ProductModelID as identifier and set the Name field as title.

Once all of the steps above are complete you’ll need to configure some additional settings in Central Administration. First we need to configure permissions.

  1. Open Central Administration.
  2. Navigate to Manage service applications and select the Business Data Connectivity Service Application then press Manage in the ribbon or simply click the service application name.
  3. Grant your search default content access account permissions to the metadata store or individual objects by using the Set Object Permissions and Set Metadata Store Permissions in the ribbon.

Now let’s add default actions to the ProductModel and Product external content types. The default action

  1. Click the ProductModel external content type.
  2. Press the Add Action button in the ribbon.
  3. Set the URL to something like http://www.contoso.com/products/{0} – this is going to be the location to the product rollup page on the publishing site.
  4. Press Add Parameter and select the Name field.
  5. Check the Default action checkbox and press OK.
  6. Repeat the steps above for the Product external content type but use http://www.contoso.com/products/{0}/{1} as the url, ProductModel field as the first parameter and ProductID field as the second parameter.

Search

At this point we are almost done and are ready to crawl and index the data.

  1. Navigate to the Search Service Application in Central Administration.
  2. Click Content Sources link in the left navigation section under Crawling.
  3. Click New Content Source.
  4. Set the Name to AdventureWorks2012.
  5. Select Line of Business Data as the Content Source Type.
  6. Select the Business Data Connectivity Service Application in the dropdown.
  7. Select the Crawl selected external data source option and check the checkbox next to AdventureWorks2012.
  8. Press OK.
  9. Start Full Crawl for the newly added AdventureWorks2012 content source.

When the crawl is done, navigate to the Search Center site and run a search query for contentsource:AdventureWorks2012. You should now be getting search results back. In my next blog post I’ll show how to surface these search results on the SharePoint site using Managed Navigation and Content By Search web parts.

Adding Search Metadata to Publishing Site Pages in SharePoint 2010

Scenario

You have a SharePoint publishing site with a number of pages that display dynamic content based on a query string. You followed a process similar to Crawling Publishing Sites in SharePoint 2010 to configure SharePoint search to index the dynamic page content. Now you’d like to enrich the items in the search index with additional metadata that can be used for property restriction queries or for adding custom refiners.

Solution

Add dynamically generated META tag to the page. SharePoint will automatically create a crawled property of type Text under in the Web category using the name attribute of the META tag as the crawled property name. You can then map the crawled property to a new managed property that will get its value populated with the content attribute value of the META tag.

Example

I’ll use the web part and pages created in my previous blog post and will simply extend the web part to generate a META tag.

[ToolboxItemAttribute(false)]
public class ProductInformation : WebPart
{
    protected override void CreateChildControls()
    {
        // get the model number from query string
        string modelNumber = Page.Request.QueryString["ModelNumber"];
        if (!string.IsNullOrEmpty(modelNumber))
        {
            // assign a product category based on the model number
            string productCategory = string.Empty;
            switch (modelNumber)
            {
                case "M300":
                case "M400":
                case "M500":
                case "X200":
                case "X250":
                    productCategory = "Digital Camera";
                    break;
                case "X300":
                case "X358":
                case "X400":
                case "X458":
                case "X500":
                    productCategory = "Digital SLR";
                    break;
            }

            // set the page title
            ContentPlaceHolder contentPlaceHolder = (ContentPlaceHolder)Page.Master.FindControl("PlaceHolderPageTitle");
            contentPlaceHolder.Controls.Clear();
            contentPlaceHolder.Controls.Add(new LiteralControl() { Text = string.Format("{0} {1}", modelNumber, productCategory) });

            // add the model number and product category to the page as an H2 heading
            Controls.Add(new LiteralControl() { Text = string.Format("<h2>{0} {1}</h2>", modelNumber, productCategory) });

            // generate a META tag
            Page.Header.Controls.Add(new HtmlMeta() { Name = "modelnumber", Content = modelNumber });
        }
    }
}

If we refresh one of the product information pages after deploying the code change above, we should be able to see the META tag in the page source.

<meta name="modelnumber" content="M300" />

Now run a full crawl and then verify that the crawled property was created by going to Central Administration > Search Service Application > Metadata Properties > Crawled Properties (for SharePoint Search) or to Central Administration > Query SSA > FAST Search Administration > Crawled property categories > Web (for FAST Search).

Next, create a new managed property of type Text and add a mapping to the crawled property above. If using FAST Search, also check the Query property and Refiner property checkboxes.

Run another full crawl and the managed property is now ready to be used for property restriction queries or as a refiner.

Let’s test it by running the following query first:
PropertyRestrictionQuery

You can now also use the new managed property as a refiner.
CustomPropertyRefiner