Show Search Results on Any Page in SharePoint 2010

SharePoint users and site owners often think of search results as a stand-alone page but it’s also a great way to aggregate content across different sites, site collections and even web applications that share the same search index without the limitations and performance issues associated with querying SharePoint lists and document libraries directly. In this blog post I’ll explain how to use the out-of-the-box Search Core Results web part to show search results on virtually any SharePoint 2010 page. We’ll use the Fixed Keyword Query property of the web part to define the search query to be executed automatically whenever a user visits the page.

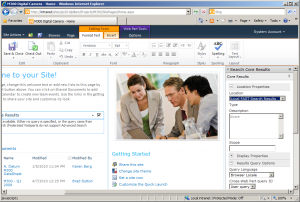
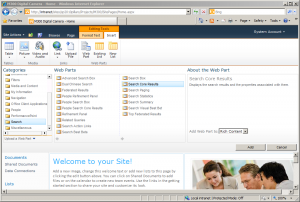
First of all, we need to edit a page and add a Search Core Results web part to it:

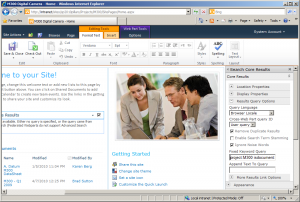
Next, let’s edit the web part and set the Fixed Keyword Query property to the desired search query:

Then, set the Location web part property to the configure where the search results will be coming from. In this case I use FAST Search:

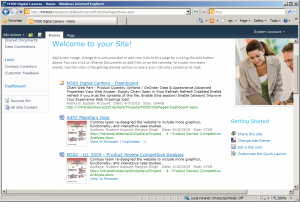
And that’s it, just save your changes, refresh the page and you’ll see the expected search results right on the page:

The Search Core Results web part is very flexible and exposes many different properties that allow you to customize what information is displayed and how the search results will appear on the page so I highly recommend spending some time to familiarize yourself with the customization options available out-of-the-box and require no custom web part development efforts.

Adding a Custom Property Search Refiner in SharePoint 2010

In the previous blog post Extending FAST Search Processing Pipeline we created a new custom managed property called Project and extended the FAST Search processing pipeline to populate the property with values. In this article we’ll give users the ability to refine results based on the new property values by adding a new refiner to the search results page in the search center.

First we’ll navigate to the results.aspx page by submitting a search query.

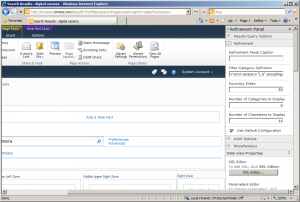
Next we need to Edit the page and bring up the Refinement Panel properties.

The properties we are interested in are the Filter Category Definition and Use Default Configuration. Go ahead and copy the Filter Category Definition property content into your favorite text editor. Insert the following element into the original xml content. Note that the managed property name set in the MappedProperty attribute must be in all lower case letters.

<Category Title="Project" Description="Project number" Type="Microsoft.Office.Server.Search.WebControls.ManagedPropertyFilterGenerator" MetadataThreshold="1" NumberOfFiltersToDisplay="4" MaxNumberOfFilters="20" ShowMoreLink="True" MappedProperty="project" MoreLinkText="show more" LessLinkText="show fewer" ShowCounts="Count" />

Then make sure to uncheck the Use Default Configuration checkbox, hit Apply to submit the web part changes and Save the page. You should see similar results as in the screenshot below:

Now the users have the ability to easily refine search results by Project without having to go back and add any additional metadata to existing SharePoint content – the Project property values are generated dynamically based on the location of the document within SharePoint site hierarchy by the custom processing pipeline module implemented in the earlier blog post.

Extending FAST Search Processing Pipeline

One of the major benefits of using FAST Search for SharePoint Server 2010 (FS4SP) is the ability to extend the item processing pipeline and modify existing or populate new crawled properties of each document programmatically. This concept may sound complicated at first but in reality it’s not that hard at all. In this blog post I’m going to show how to integrate a C# console application into the processing pipeline and use custom logic to populate an additional crawled property for each item in the search index.

Let’s say we have a number of SharePoint project sites where each site contains information about a different digital camera model and we’d like to tag each document located within any of the project sites with the project name (camera model) in the search index without adding any extra metadata to SharePoint items.

To accomplish that we are going to populate a custom crawled property called Project by extracting the project name from site urls that match a specific pattern:

  • http://intranet/sites/sp2010pillars/Projects/M300/
  • http://intranet/sites/sp2010pillars/Projects/M400/
  • http://intranet/sites/sp2010pillars/Projects/M500/
  • http://intranet/sites/sp2010pillars/Projects/X200/
  • http://intranet/sites/sp2010pillars/Projects/X250/

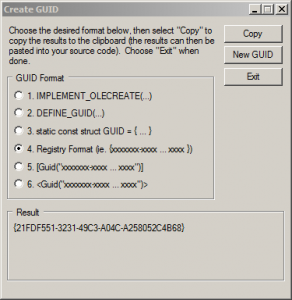
First of all we need to create a new crawled property to be populated. It is a good practice to create a new crawled property category so that the custom crawled properties don’t get mixed up with SharePoint or any other properties in the search index schema. Since crawled property categories are uniquely identified with a GUID, we need to generate a new GUID. One option is to use Visual Studio 2010 for that – Tools -> Create GUID:

Next we’ll use PowerShell to create the new category called Custom and add the new Project crawled property to it. In the next blog post I’m planning to show how to add a new refiner to the FAST Search Center based on the values we populate the Project crawled property with so let’s go ahead and create and map it to a new managed property.

Add-PSSnapin Microsoft.FASTSearch.Powershell -ErrorAction SilentlyContinue

$guid = "{21FDF551-3231-49C3-A04C-A258052C4B68}"
New-FASTSearchMetadataCategory -Name Custom -Propset $guid

$crawledproperty = New-FASTSearchMetadataCrawledProperty -Name Project -Propset $guid -Varianttype 31
$managedproperty = New-FASTSearchMetadataManagedProperty -Name Project -type 1 -description "Project name extracted from the SharePoint site url"

Set-FASTSearchMetadataManagedProperty -ManagedProperty $managedproperty -Refinement 1
New-FASTSearchMetadataCrawledPropertyMapping -ManagedProperty $managedproperty -CrawledProperty $crawledproperty

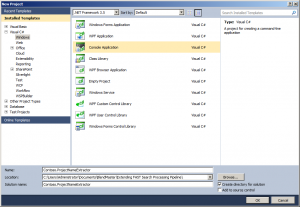
Now we are ready to create the console application that contains our custom logic.

The following code is going to be used to read the url input crawled property value, check if it matches our project site url pattern and extract the project name from the url if it’s a match.

using System;
using System.Linq;
using System.Xml.Linq;
using System.Text.RegularExpressions;

namespace Contoso.ProjectNameExtractor
{
    class Program
    {
        // special property set GUID that contains the url crawled property
        public static readonly Guid PROPERTYSET_SPECIAL = new Guid("11280615-f653-448f-8ed8-2915008789f2");

        // Custom crawled property category GUID that contains the Region crawled property
        public static readonly Guid PROPERTYSET_CUSTOM = new Guid("21FDF551-3231-49C3-A04C-A258052C4B68");

        // crawled property name to be populated
        public const string PROPERTYNAME_REGION = "Project";

        static void Main(string[] args)
        {
            XDocument inputDoc = XDocument.Load(args[0]);

            // retrieve the url input property value
            string url = (from cp in inputDoc.Descendants("CrawledProperty")
                          where new Guid(cp.Attribute("propertySet").Value).Equals(PROPERTYSET_SPECIAL) &&
                          cp.Attribute("propertyName").Value == "url" &&
                          cp.Attribute("varType").Value == "31"
                          select cp.Value).First();

            XElement outputElement = new XElement("Document");

            // project site url regex
            Match urlMatch = Regex.Match(url, "(?<=http://intranet.contoso.com/sites/sp2010pillars/Projects/).*?[^/]+", RegexOptions.IgnoreCase);
            if (urlMatch.Success)
            {
                // populate the custom Region crawled property
                outputElement.Add(
                    new XElement("CrawledProperty",
                        new XAttribute("propertySet", PROPERTYSET_CUSTOM),
                        new XAttribute("propertyName", PROPERTYNAME_REGION),
                        new XAttribute("varType", 31),
                        urlMatch.Value)
                        );
            }

            outputElement.Save(args[1]);
        }
    }
}

At this point we are ready to deploy the application to the FAST Search servers. In order to do that we need to copy the executable to each FAST server running document processors and modify the pipelineextensibility.xml file located in the FASTSearch\etc folder on each of those servers. Keep in mind that the pipelineextensibility.xml file can get overwritten if you install a FAST Search Server 2010 for SharePoint update or service pack. Below is the file content assuming that the executable is located in the FASTSearch\bin folder:

<PipelineExtensibility>
	<Run command="Contoso.ProjectNameExtractor.exe %(input)s %(output)s">
		<Input>
			<CrawledProperty propertySet="11280615-f653-448f-8ed8-2915008789f2" varType="31" propertyName="url"/>
		</Input>
		<Output>
			<CrawledProperty propertySet="21FDF551-3231-49C3-A04C-A258052C4B68" varType="31" propertyName="Project"/>
		</Output>
	</Run>
</PipelineExtensibility>

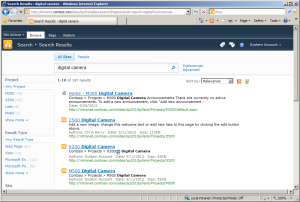
Once all of the above is in place, simply execute psctrl reset command in Microsoft FAST Search Server 2010 for SharePoint shell and submit a full crawl for the SharePoint content source. When the full crawl is complete let’s run a search query for “digital camera” and take a look at the Project property value in the results:

As you can see, the managed property is populated with the expected values. In the next post I’ll show how to use this new property as a custom refiner in the FAST Search Center.

References:

  1. Integrating an External Item Processing Component
  2. CrawledProperty Element [Pipeline Extensibility Configuration Schema]

FAST Search User Contexts and Best Bets in SharePoint 2010

In the previous post FAST Search User Contexts and Site Promotions in SharePoint 2010 I covered the overall concept of FAST Search User Contexts in SharePoint 2010 and provided instructions necessary to configure user contexts with SharePoint user interface and PowerShell scripts. This short post expands the topic and shows how to create best bets and associate them with specific user contexts.

The scenario is going to be very simple – for the “team site” search query we will display the Sales Team Site best bet to users from the Sales department and Marketing Team Site best bet to users from the Marketing department.

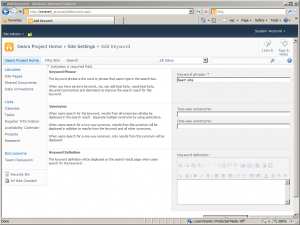
First of all, we need to create a FAST Search keyword for the “team site” phrase. You can do that by navigating to Site Settings -> Site Collection Administration -> FAST Search keywords -> Add Keyword:

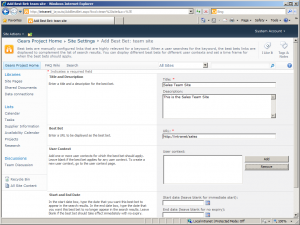
Next, click the newly added keyword and then Add Best Bet. Enter the Title, Description and the URL for the best bet:

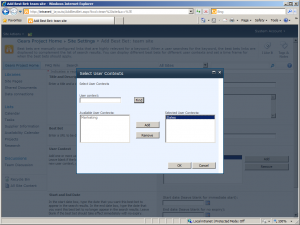
Press the Add button in the User Context and select the user context:

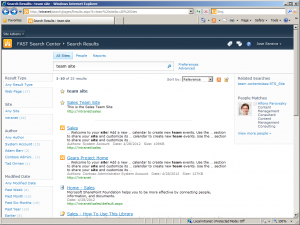
Repeat the steps above to add a best bet and associate it with the other user context. If we now login to the site as a user from the Sales department and execute the search for “team site” then that’s what we are going to get back. You can see that only the best bet for the Sales Team Site is displayed to the user:

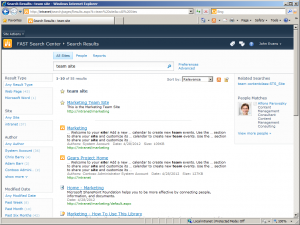
Similarly, only the Marketing Team Site best bet is displayed to the user from the Marketing department:

Here’s the PowerShell equivalent (the script assumes that you created the Sales and Marketing user contexts from the previous blog post and that the site collection ID matches your search center site host):

Add-PSSnapin Microsoft.FASTSearch.Powershell -ErrorAction SilentlyContinue

$siteCollectionId = "69d025ce-96a7-4131-adc0-7da1603e8d24"
$searchSettingGroup = Get-FASTSearchSearchSettingGroup -Name $siteCollectionId

$keyword = $searchSettingGroup.Keywords.AddKeyword("team site")

$uri = New-Object -TypeName System.Uri -ArgumentList "http://intranet/sales"
$bestBet = $keyword.AddBestBet("Sales Team Site", $uri)
$bestBet.Description = "This is the Sales Team Site"
$bestBet.Contexts.AddContext("Sales")

$uri = New-Object -TypeName System.Uri -ArgumentList "http://intranet/marketing"
$bestBet = $keyword.AddBestBet("Marketing Team Site", $uri)
$bestBet.Description = "This is the Marketing Team Site"
$bestBet.Contexts.AddContext("Marketing")

FAST Search User Contexts and Site Promotions in SharePoint 2010

You may have heard about this cool feature of FAST Search for SharePoint Server 2010 (FS4SP) called user context. FAST Search user contexts allow you to use SharePoint user profile property values such as Office Location and Ask Me About (in the out-of-the-box configuration) or any other to boost search results.

This article shows how easy it is to configure a SharePoint user profile property to be used with FAST Search user contexts, define user contexts based on specific property values and then associate those user contexts with sites and documents to be boosted in search results (feature called FAST Search Site Promotions). You have an option to use SharePoint user interface or PowerShell to perform most of the configuration steps so I’ll cover both. As an example, I’m going to use standard Department user profile property to boost search results for certain SharePoint sites for different users. Users from Sales and Marketing departments will have different search results boosted for the same search term.

We’ll start by configuring the FAST user context to be based on the Department user profile property using the following PowerShell command :

Add-PSSnapIn Microsoft.SharePoint.PowerShell -ErrorAction SilentlyContinue
Set-SPEnterpriseSearchExtendedQueryProperty -SearchApplication "FASTQuery" -Identity "FASTSearchContextProperties" -Value "Department"

Next we need to perform an iisreset on the SharePoint WFE in order for the change to be reflected in the UI.

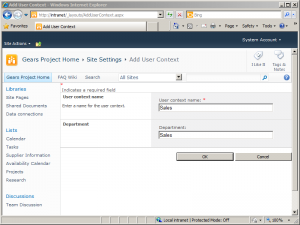
We can now add new user contexts by using different variations of the Department property values by going to Site Actions -> Site Collection Administration -> FAST Search user context -> Add User Context. Let’s go ahead and create a user context for Sales and Marketing.
If you have a large number of user contexts to be created and deployed to multiple environments then you may want to automate the process with PowerShell:

Add-PSSnapin Microsoft.FASTSearch.Powershell -ErrorAction SilentlyContinue

$siteCollectionId = "69d025ce-96a7-4131-adc0-7da1603e8d24"
$searchSettingGroup = Get-FASTSearchSearchSettingGroup -Name $siteCollectionId

$userContext = $searchSettingGroup.Contexts.AddContext("Sales")
$expression = $userContext.AddAndExpression()
$expression.AddMatchExpression("Department", "Sales")

$userContext = $searchSettingGroup.Contexts.AddContext("Marketing")
$expression = $userContext.AddAndExpression()
$expression.AddMatchExpression("Department", "Marketing")

Note that the commands above need to be executed on the FAST Search server and remember to use the site collection ID of the site collection that hosts your search center site. As you can see, the script approach is much more flexible than the SharePoint user interface in terms of the expressions you can use to define the context.

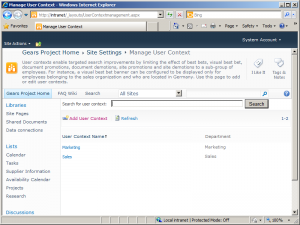
Once the user contexts are setup, you should see something similar on the Manage User Context page:
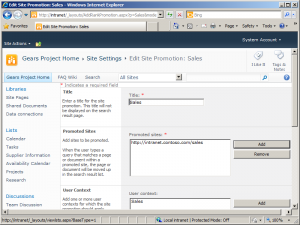
Next we are going to add a couple of site promotions and associate each one with a different user context. Navigate to Site Settings -> Site Collection Administration -> FAST Search site promotion and demotion -> Add Site Promotion, then add the Sales team site url to the Promoted Sites list and Sales user context to the User Context list:
Follow the same steps to create another site promotion but this time for the Marketing team site.

An alternate way of creating site promotions would be using the following PowerShell commands:

Add-PSSnapin Microsoft.FASTSearch.Powershell -ErrorAction SilentlyContinue

$siteCollectionId = "69d025ce-96a7-4131-adc0-7da1603e8d24"
$searchSettingGroup = Get-FASTSearchSearchSettingGroup -Name $siteCollectionId

$siteUri = New-Object -TypeName System.Uri -ArgumentList "http://intranet.contoso.com/sales"
$sitePromotion = $searchSettingGroup.PromotionsWithoutKeyword.AddPromotion("Sales")
$sitePromotion.PromotedItems.AddPromotedLocation($siteUri)
$sitePromotion.Contexts.AddContext("Sales")

$siteUri = New-Object -TypeName System.Uri -ArgumentList "http://intranet.contoso.com/marketing"
$sitePromotion = $searchSettingGroup.PromotionsWithoutKeyword.AddPromotion("Marketing")
$sitePromotion.PromotedItems.AddPromotedLocation($siteUri)
$sitePromotion.Contexts.AddContext("Marketing")

When creating site promotions using PowerShell, you also have the ability to specify a boost value other than the default value of 1000. Simply set the $sitePromotion.BoostValue property to the desired value.

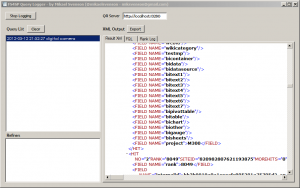
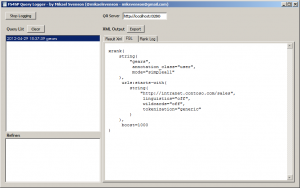
Finally, we are ready to verify if the search result boosting actually works. We are going to use the FAST Search for SharePoint 2010 Query Logger tool to take a look at the FQL commands being submitted and executed on the FAST query server. If we execute a search query in SharePoint using credentials of a user account having the Department user profile value set to Sales, we’ll see that an additional xrank expression has been added to the original query:
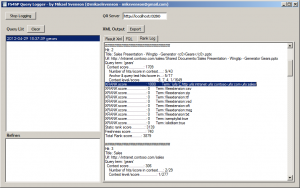
As you can see, the boost of 1000 points has been added to the final rank of the sales presentation document located on the Sales team site:
I hope you find it useful to see a specific example of creating FAST Search user contexts and site promotion in both SharePoint user interface and with PowerShell. In my next post, I’ll expand on the topic of user contexts and show an example of best bets targeting.
Search and Claims-Based Authentication in SharePoint 2010

In order to enable crawling for web applications configured with claims-based authentication in SharePoint 2010, it is required that Windows Authentication is enabled for at least one Zone. In cases when Forms Based Authentication or a Trusted Identity Provider is configured for the Default Zone, it is a common practice to extend the web application and enable Windows Authentication for the extended zone. Search is then setup to crawl the extended zone url. There’s a couple of issues with crawling a non-default zone though:

  1. Documents in the index are tagged with the extended zone urls so the search results in the Search Center point to that location rather than to the default zone
  2. Contextual search (This Site) doesn’t work as SharePoint appends the default zone url filter to the search query

Those may sound like major obstacles but it turns out there’s a simple solution, although it does require some manual configuration in Central Administration. The following steps apply to both SharePoint 2010 Search and FAST Search Server 2010 for SharePoint.

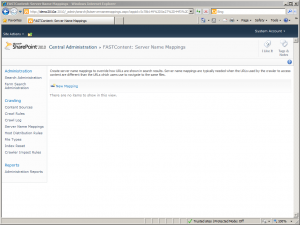
In Central Admin, navigate to Manage Service Applications -> Search Service Application (FAST Search Connector for FS4SP), then click on Server Name Mappings within the Crawling section.

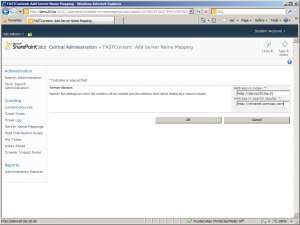
Now add a new mapping for each non-default zone url being crawled. Enter the extended zone url in the “Address in index” field and the default zone url in the “Address in search results” field.

Once all server name mappings are in place, complete a full content crawl and that’s it! Your search results will show correct urls in the Search Center and contextual search will work properly.

GAC Multiple Assembly Versions Using SharePoint 2010 Solution Package

Ever wanted to deploy multiple versions of an assembly to the GAC as part of a SharePoint 2010 solution package? Visual Studio 2010 makes it easy to GAC a single assembly version but will throw an error similar to the one below if you try to package a project with multiple versions of a dll, in this case AjaxControlToolkit.dll.

Both "Contoso.SharePoint" and "Contoso.SharePoint" contain a file 
that deploys to the same Package location: AjaxControlToolkit.dll.

The solution is simple and this post walks through it step-by-step.

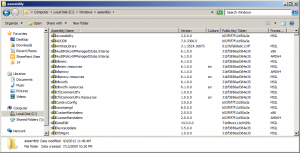
We start with no AjaxControlToolkit.dll versions in the GAC.

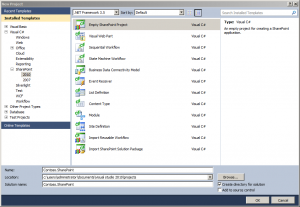
Next, we are going to create a new SharePoint 2010 project in Visual Studio 2010 (or you can use an existing project).

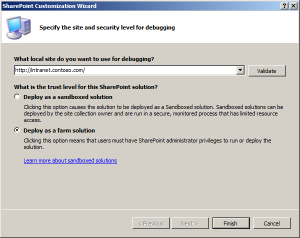
Make sure that “Deploy as farm solution” option is selected.

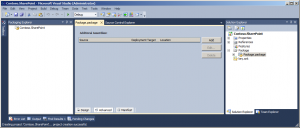
Then double-click the Package.package in the Solution Explorer and click Advanced in the lower-left corner.

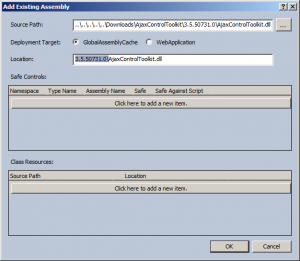
Press Add and select the “Add Existing Assembly…” option, browse to the location of one version of the assembly – in my case 3 different versions are stored in subfolders under the AjaxControlToolkit parent folder. Visual Studio automatically populates the Location field with the assembly name – go ahead an prefix the name with the version number followed by a backslash. Repeat for each version of the dll.

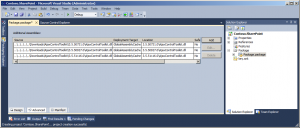
Now all versions of the assembly should appear in the Additional Assemblies grid in Visual Studio.

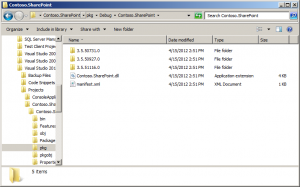
If we package the project and browse to the pkg folder, you’ll see that each version of the assembly is located in a separate subfolder.

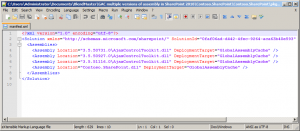
Opening the manifest file also confirms that all assembly versions are included in the solution package.

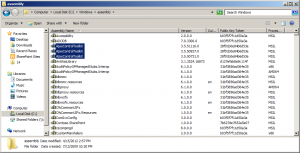
Go ahead and deploy the solution package and, voilà, all of our assembly versions are now in the GAC!